Showing posts with label Lawn Fawn. Show all posts

14 July 2026

Lawn Fawn Bee and Honey Birthday Card.

Hello, Terri here! Today I am sharing a cute Honey Bee-themed birthday card using Lawn Fawn products.

I started by Creating the Bee for my focal point. I used the Build-A-Bunny and Build-A-Critter Bug Costumes. I die cut the elements from coloured cardstock and adhered them with liquid glue. I wanted to add a big jar of honey for the bee to sit next to, to do this I used the Build-A-Drink Mason Jar Add-on  and Build-A-Drink Mason Jar Jam and Honey Add-on. I added a layer of Heat Resistant Acetate over the top of the jar to give the look of glass. I then stamped the word HONEY on the label using the Jam and Honey Sentiments.


To create the background I used the Cloudy Stencil to add some puffy clouds to a piece of white card, I used a soft blue ink and a medium blending brush to gently add the ink. Next I added splatters using both Liquid Stardust and Gansi Tambi Watercolours. 

I set the background aside to dry and focused on the sentiments. I white heat embossed sentiments from the Henry's Build-A-Sentiment Honey Bee onto black cardstock and then trimmed them down into 4 sections.


To bring everything together, I added a piece of patterned paper from the Favourite Flannel Fall 6x6 Paper Pad to a white A2 notecard. I trimmed the background to measure 3.75" by 5" and added it to the card. At this point I realised I needed something to ground my focal images, so I cut a hill using the Simple Hillside Border Dies from white card and added some light green ink blending. Once I added this to the card, I then placed the Honey Jar and Bee sat on the hill and placed 3 flowers around them to emebllish. I then placed the sentiments in the sky using Foam Strips.

I love how this card turned out, the cute bee and the stark black sentiment strips, sitting against a soft sky create a really nice look. Thank you for stopping by today.

04 June 2023

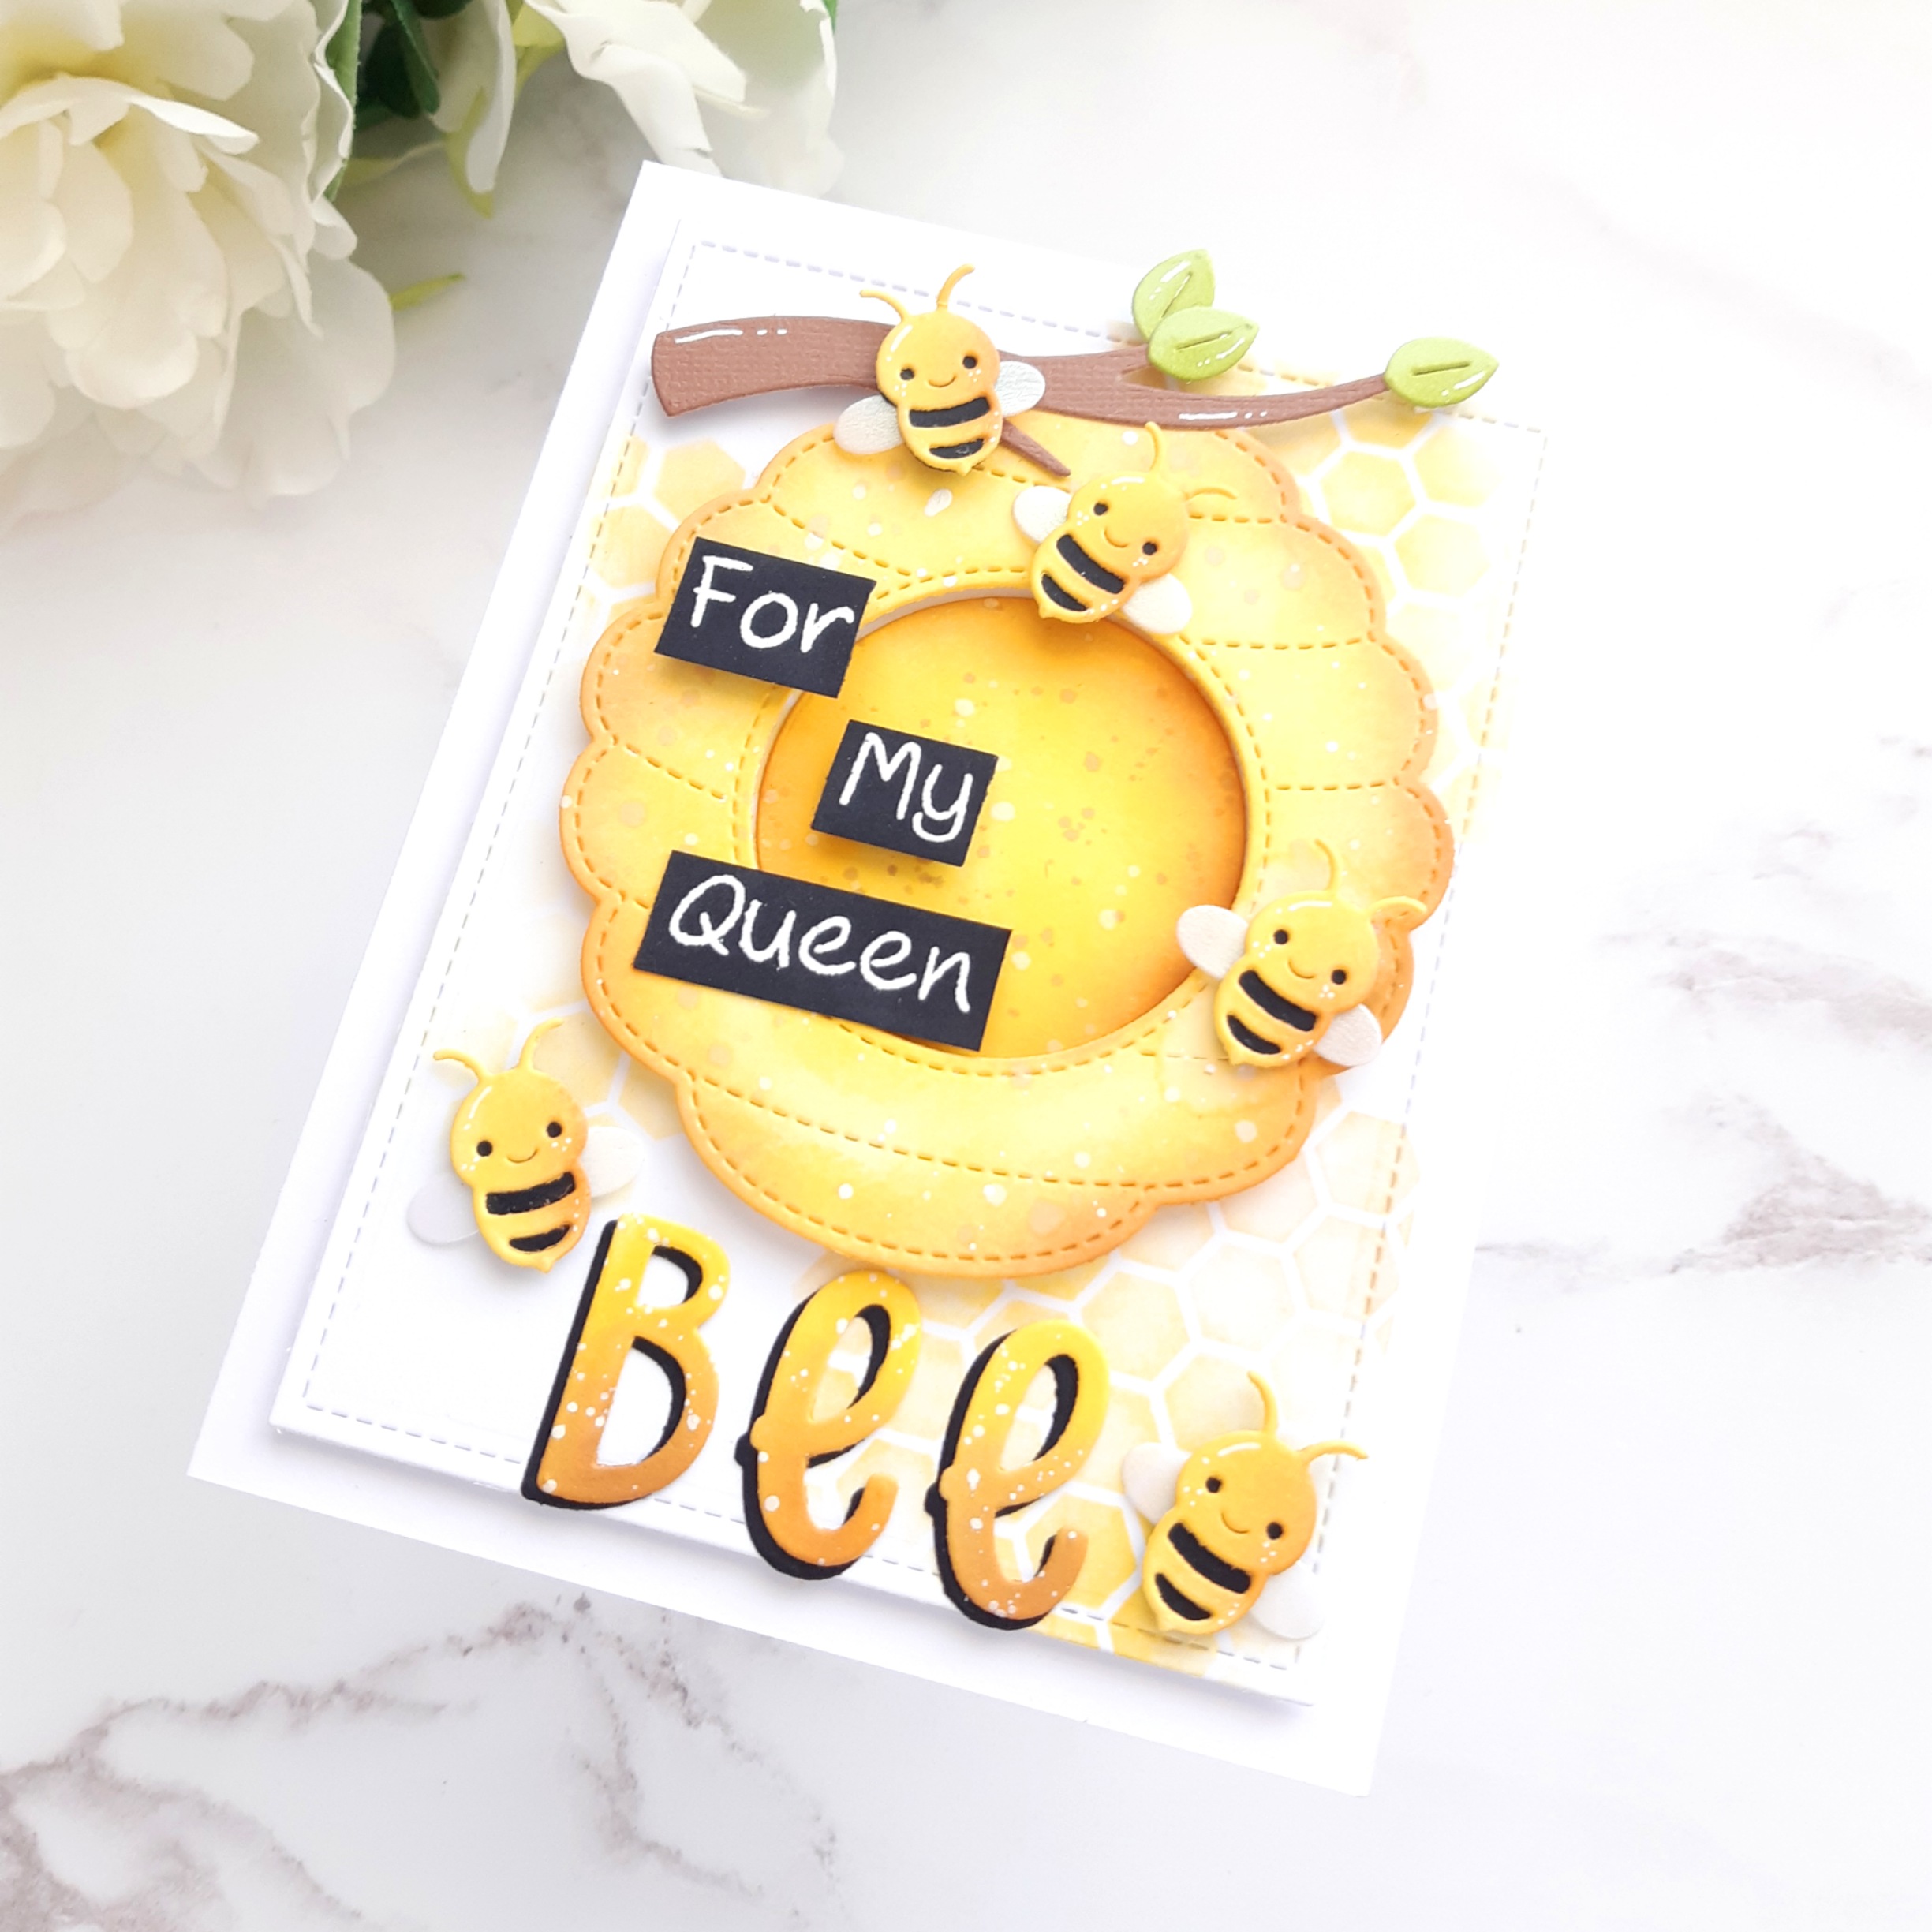
For My Queen Bee - Lawn Fawnatics Challenge #149

Hey there, It's been so long since my last post and a lot has changed in my life but the on e thing that hasn't is my love of all things Lawn Fawn. Today I am sharing an card which I am entering into the current challenge over at the 

The current challenge is a "Die only" theme, which I am really digging as I just received lots of new dies.


I used the following products to create my card:

- Magic Iris Beehive Add-on Dies

- Honeycomb Stencil

- Henry's ABC's Dies

- Jessie's ABC Stamp Set

- Pearlescent Vellum

- Stitched Rectangle Lawncuts Dies


I started by cutting a rectangle using one of the stitched rectangle Lawn cuts. I then used the Honeycomb stencil to  add a pattern in 3 places.

I die cut all of the images from coloured cardstock and added a little ink blending. The honeycomb was created by adding 3 shades of yellow, orange and brown ink over a yellow die cut honeycomb. I then added inky splatters in brown and white ink.

The stamped sentiment was white heat embossed onto black card and the die cut word was cut from yellow and ink blended, splattered and then mounted onto a black die cut to create a dropped shadow.


I cut the bees from yellow and black card, added some light ink blending before placing pearlescent vellum wings Beneath. All images had some highlights added with a white gel pen.

I used a brown textured cardstock to cut the branch and added a few green die cut leaves, which once again I added a little ink blending to.

I adhered the stencilled rectangle onto an A card base and then used various thicknesses of foam tape to add all of the die cut elements.

I am so happy with how this card turned out, next time I will turn it into a magic iris.


15 October 2022

Monochromatic Halloween Peekaboo Pop-up card

Hey there crafty friends, today I am sharing a Monochromatic Halloween card that I am entering in to the current Lawnfawnatics challenge 134.

I started by stamping and colouring all of the images from the Fangtastic Friends Stamp Set, I chose to use greys with purple undertones. I added details with a white gel pen and then cut them out with the Fangtastic Friends Die Set.


Next I set about creating the Peekaboo Pop-Up. I cut all of the parts from 80lb Neenah Solar Crest cardstock, (if you cut from too thicker card, you will get issues with the card not closing properly.) I then added shades of purple Distress Oxide Inks to the background and to the hill. I added a die cut  black Spooky Fence to the hill.


I then used the Birch Tree Stencils to add the trees in black ink. I then started to add the die cut elements and build the scene. I kept one of the Bats to add to the moving arm. The sentiment was white heat embossed onto black card and trimmed before being added with foam tape. I added the bat to the moving arm and closed up the card. I thought it would be super cute to add the spider crawling along the front.


If you've not seen the Peekaboo Pop-Up, be sure to check out the videos from Lawn Fawn over on Youtube. The Intro to Peekaboo Pop Up can he found here Intro Video


26 May 2022

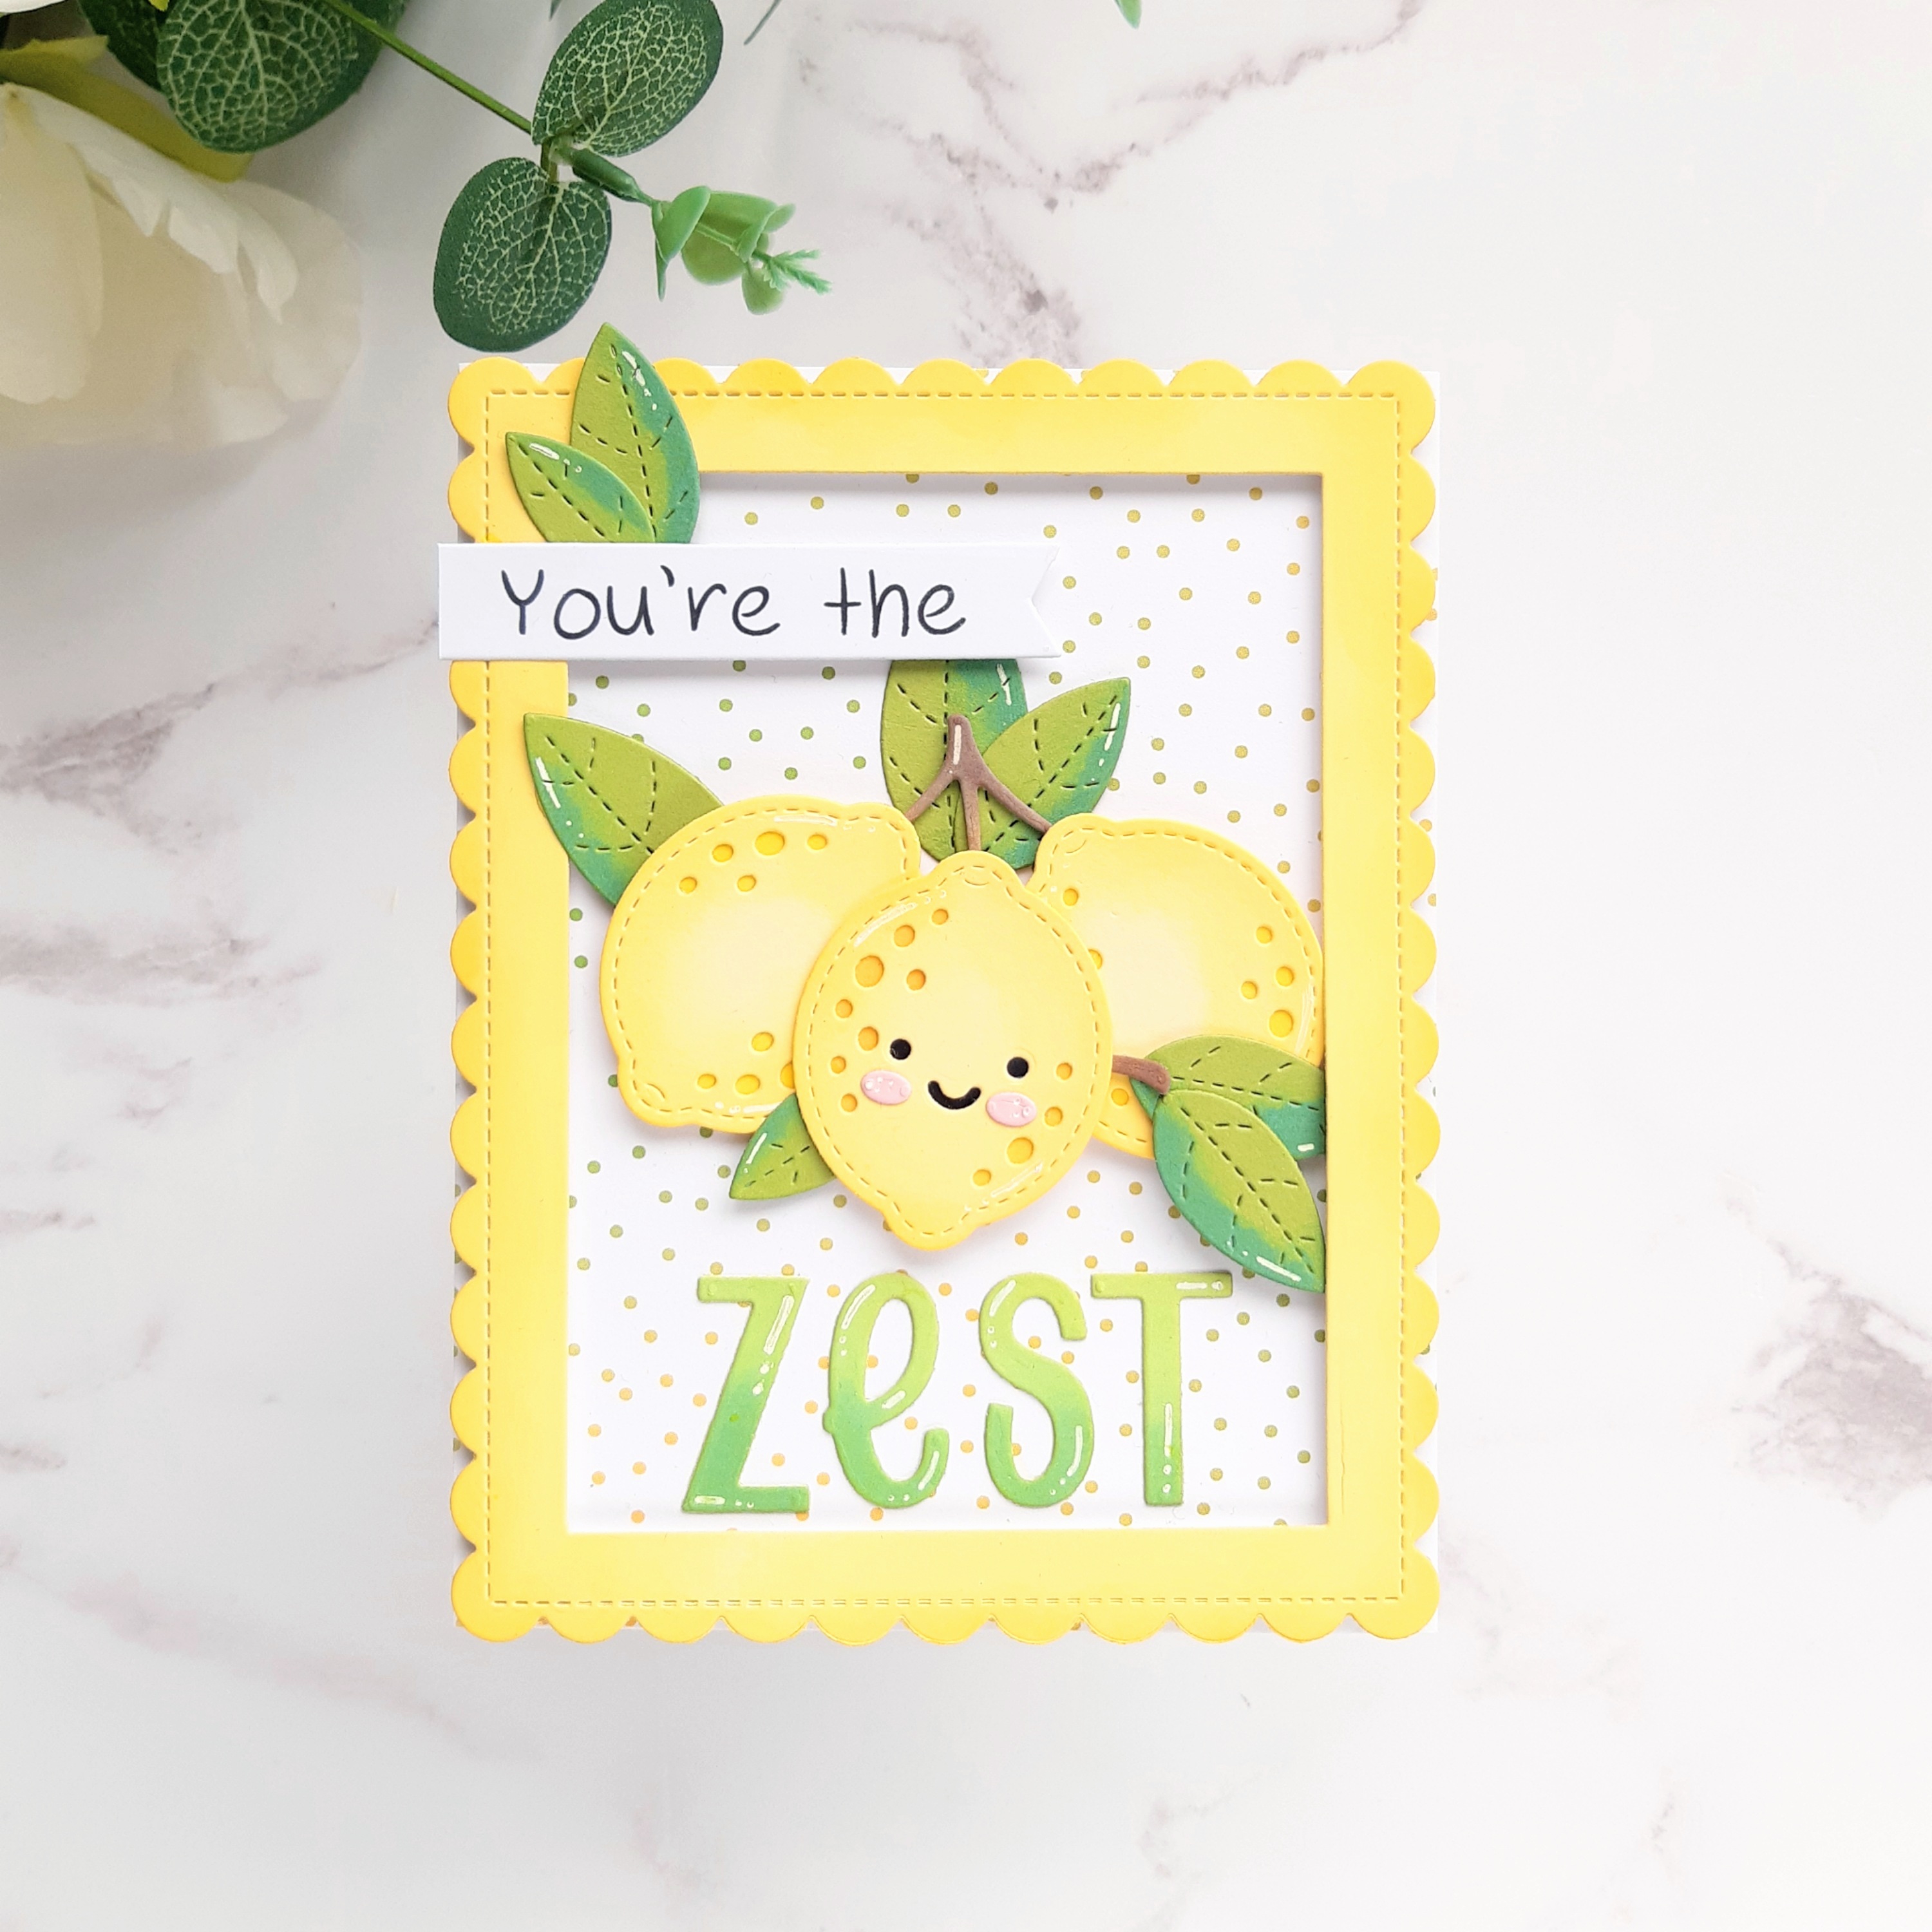
You're The Zest


Hey, I'm back with another card using the Zesty Lemon die set from Lawn Fawn's latest release. I love a good pun and I knew this die set would be perfect for creating Punny cards for my friends and family.


I started off by die cutting all of the elements from the Zesty Lemon die set from colored cardstock. I then set about adding shading using distress Oxide inks. I used Squeezed Lemonade, Wild Honey, Twisted Citron, Mowed Lawn and Vintage Photo. I then added white gel pen highlights to help bring the Lemons and leaves to life.


I created a frame using the largest Outside In stitched scalloped rectangle and the second largest die from the Large stitched rectangle stackables. I added Squeezed Lemonade Oxide ink and a tiny bit of Wild Honey to color the frame.

I prepared an A2 cardbase with a piece of Watercolor Wishes Rainbow 6x6 paper pad and the added the frame using foam tape. I arranged the lemons and leaves and then started on the sentiment. I used Henry's ABC's to cut the word "Zest" which I ink blended with a mix of Twisted Citron and Mowed Lawn Distress Oxide ink. I then stamped "You're the" using Jessie's ABC's stamp set.


I'm thrilled with how this card turned out, so I'm entering this card into the current Lawnfawnatics challenge #125 "Dies Only"

24 May 2022

Floating by to say hi


Hey there, I am beyond exited to be sharing this card today. As soon as I saw the Flamingo Floatie die I knew I needed it. I wasn't sure how or why I would use it but that really didn't matter. When it dropped through my letter box, I made this card straight away and I'm totally loving it.


I started out with a piece of soft lemon cardstock which I cut using the Largest Stitched Rectangle Stackable die. I then used the Sunray Stencil with some Squeezed Lemonade Distress Oxide ink to create the background.

I then cut some Stitched Waves from a piece of blue card, I used the Largest of the Stitched Edge Rectangle Stackable so that stitched matched all around the card. I added some Salvaged Patina and Faded Jeans Distress Oxide to the waves and a few inky splatters using white ink and Blueprint Sketch Oxide ink.


The Flamingo Floatie was cut form hot pink cardstock and had some Picked Raspberry Oxide ink added around the edge to give some shade, I also used a white gel pen to add highlights. To create the sentiment, I started with white cardstock and blended Spun Sugar, Kitsch Flamingo and Picked Raspberry Oxide inks, I then used Henry's ABC's dies to cut the letters. I added the upper part of the sentiment a little jaunty to give the impression of them floating and the lower letter where aligned neatly at the bottom of the card.


I love this card so much that I am entering it in to the current Lawnfawnatics challenge #125 which is Dies Only!

18 January 2022

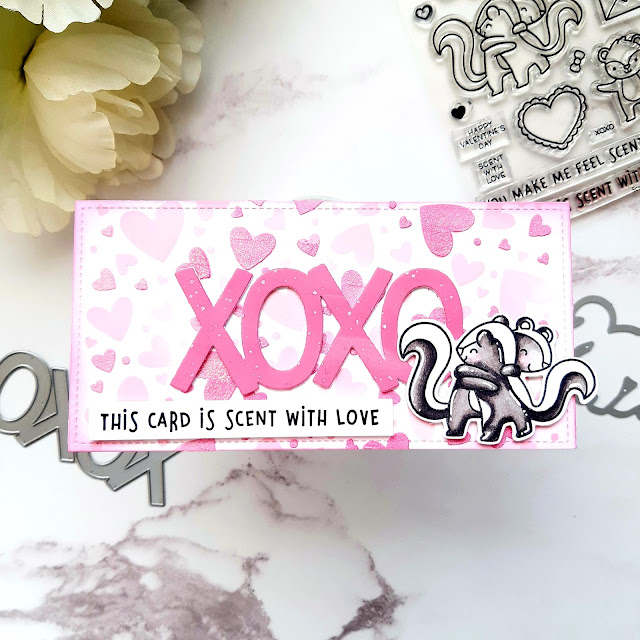
Cute Valentines card using Lawn Fawn's Scent With Love

Valentine's Day is just around the corner, so I am busy making cards for the big day.

I recently purchased the Scent With Love stamp and Die set from Lawn Fawn and couldn't wait to create a "stinkin cute card" (see what I did there,lol)

I will be entering this card into the current Lawnfawnatics challenge #117 "Lots of Heart"

To create my card I use the following products:

Large Mini Slimline Stackables die set

Giant XOXO die

Scent with love stamp and die sets.

Lots of Hearts background stencils.

I stencilled the background using the Lots of Hearts stencil set and distress oxide inks,  I used Kitsch Flamingo and Picked Raspberry. Over the darker hearts I added some glitter embossing paste. Once dry I cut the panel using the largest of the Large mini slimline stackables dies.

I stamped the Skunk images onto Neenah solar crest 80lb card using Momento ink. I coloured with Spectrum Noir's Illustrator markers ad die cut using the coordinating die.  I ink blended some of the Picked Raspberry ink onto some thick white card and then die cut the Giant XOXO die. I also added some Liquid stardust onto the Giant XOXO for added sparkle.

Before adding all of the elements to the card I thought the Skunks would benefit from some white Gel Pen highlights. I took one of the sentiments from the set and stamped it on to a strip of card. All elements were added using foam tape for dimension. 

01 January 2022

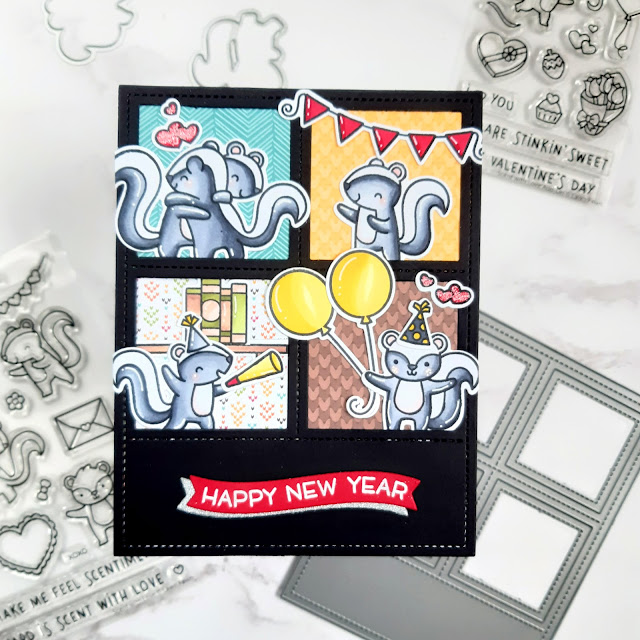
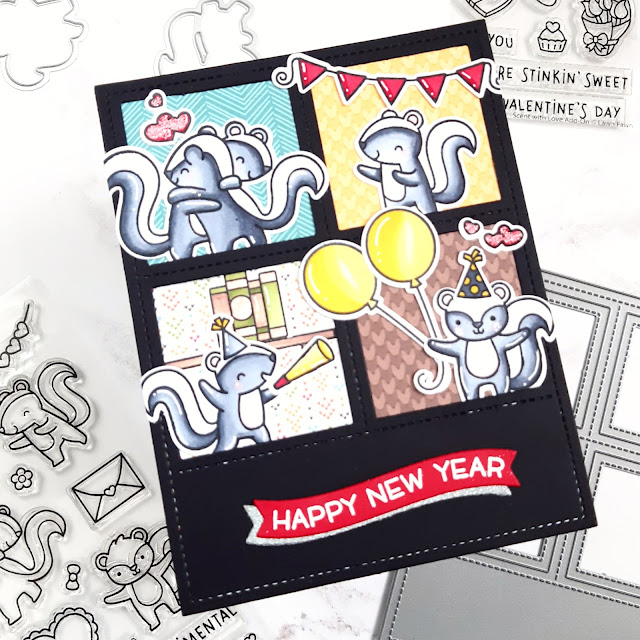
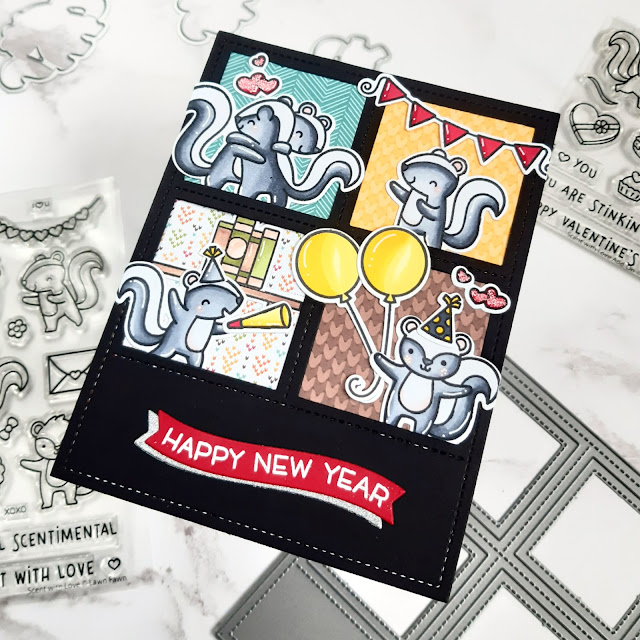
Happy New Year with Lawn Fawn's Scent with Love

Happy new year crafty friends, what better way to start the year then some Lawn Fawn goodness. I have created a New Year Celebration card that is going to be sent to a friend.

All images were coloured with Spectrum Noir Illustrator makers onto Neenah 80lb solar crest and detailed with a white gel pen.

I started by stamping out off of the images onto Neenah using Memento Tuxedo Black ink. As mentioned above I coloured all of the images with my Illustrator markers, I think my colouring is starting to improve but I will be working on it in 2022. I cut the images using the coordinating dies and added highlights with a white gel pen.

Using scraps of paper from the Knit Picky and Into the Woods remix pads I created wall paper for each of the apertures in the Foursquare backdrop. I cut the Foursqaue backdrop from Lynda Chapman's Black cardstock, it is the blackest card I've ever used. I added the die cut panel over the scraps of paper using a dotty tape runner. I then started adding the die cut images into their little windows to create scenes, using the dotty tape runner allowed me to lift the Foursquare and slide images behind.

I white heat embossed the sentiment from the Wavy winter words onto a banner cut in red using the Simple Wavy Banners dies.

 Products used - 

  • Foursquare Backdrop:Portrait
  • Scent with love stamp and dies
  • Scent with love add-on stamp and dies
  • Virtual Friends Add-on stamp and dies (Bunting)
  • Scootin' By stamp an dies (Hat and Hearts)
  • Purrfectly Wicked stamp and dies (Shelf and books)
  • Party Animal stamp and dies (Party hat, blower and ballons)
  • Winter Wavy saying stamp
  • Simple Wavy banners dies
  • Scraps of paper from Knit Picky 6x6 and Into the Woods remix 6x6 pads

I'm entering this card for the current Lawnfanatics challenge


Here's hoping that 2022 brings us all health and happiness.


25 October 2021

Trick or Treat with Spectrum Noir TriBlends


Hey there, a really quick post from me today, I'm sharing a super adorable Halloween card using lots of my favourite Lawn Fawn products.

I created the spooky castle using the Build A Castle die set, I added a spooky fence and my trick or treaters are from the Costume Party set. The cat, ghosts and bats are from the Tiny Halloween set.

All of the images were coloured with Spectrum Noir Markers. I used TriBlends - Orange blend, Burnt orange blend, Purple Blend, Citrus Blend, Pale Pink blend, Fair Skin blend, Brown grey blend, Earth Brown Blend, Gold Brown blend and Illustrator BGR5.


The background was ink blended with distress oxide inks in Seedless preserves, picked raspberry, twisted citron and bundled sage. White acrylic paint splatters were added to the sky.

Happy Halloween

07 June 2021

Sending Virtual Hugs


Today I am sharing a card I made recently using some newer items from Lawn Fawn. I stamped all images onto Neenah Solar Crest cardstock using Versafine Tuxedo Black ink. I coloured the images using Spectrum Noir Illustrators in the following colours;

GY1,2,3  CG1,2,3,4  CR1,3,5  CT1,2,3  GB1,3,4,6  BG1,3,5,7  BT05, I used a white gel pen to add highlights.

I used the following stamps, dies and paper pad to create my card;

Virtual Friends stamp and die set

Virtual Friends add on stamp and die set

Long Distance Hugs stamp and die set

Stitched Hillside Borders die set

Outside in Stitched Rectangles

Den Sweet Den stamp and die set

Perfectly Plaid remix 6x6 pad

Thank you for stopping by today, have a great week ahead. 


30 March 2021

Have a Beary cozy day

Hi There, today I am sharing a card created with Lawn Fawn's Den Sweet Den.


The images were coloured using Spectrum Noir's Illustrator Markers in the following colours CT1,2,3 DR1,2,3 AG1,2,3 TB2,3,4 MB1,2,3 RB1,2,3,4.

I used the scalloped rectangle dies and a piece of paper from the Into the Woods Remix 6x6 paper pad. The sentiment was white heat embossed onto a black strip, this created the perfect place to sit the images.

Thank you for taking the time to stop by today, have a fabulous day.

27 March 2021

Anyone for Sushi...

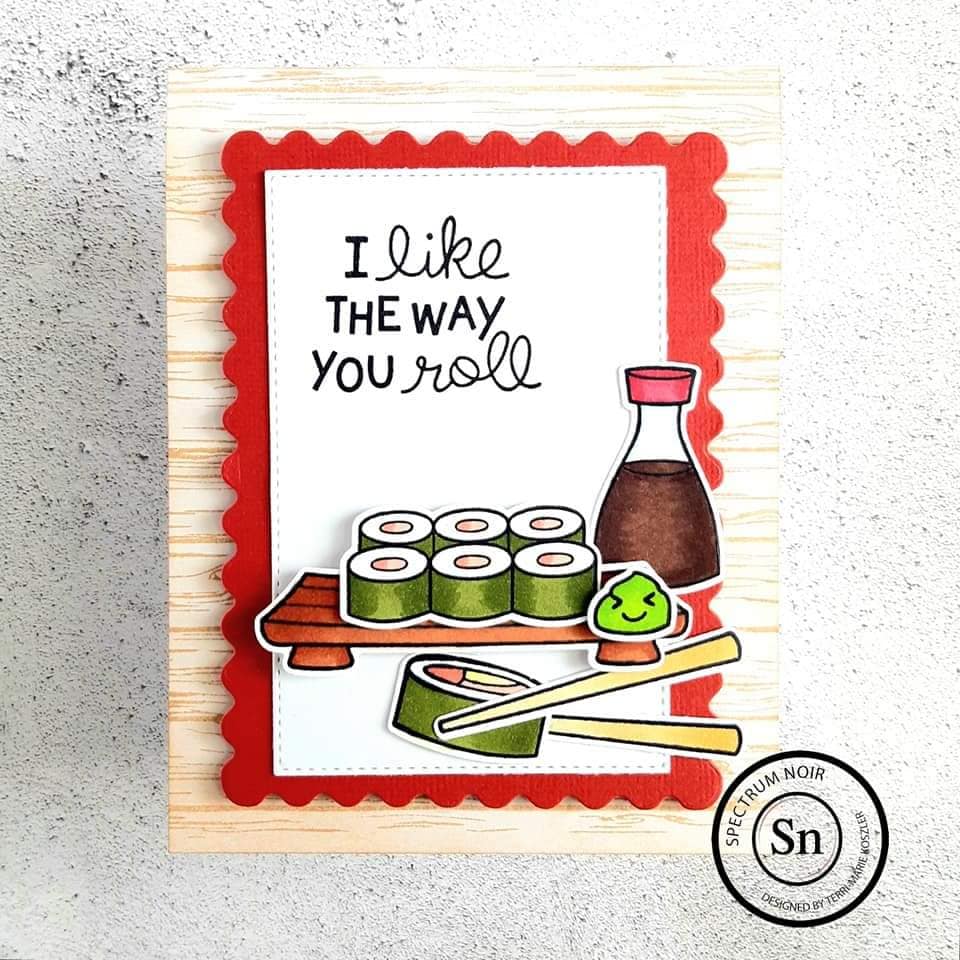
Hey, today I am sharing a card using Lawn Fawn's Lets roll stamp and die set. I will be using Spectrum Noir markers and ink pads to colour.


I stamped all of the images using Spectrum Noir Finesse ink pad in Noir Black. I then coloured the images using the following Spectrum Noir Illustrators; AG1, AG2, GB2, GB3, TN5, TN6, TN7, DG2, DG3, DG4, CT1, DR1, DR2, EB3, EB4, EB5, BGR1

The background was stamp with Spectrum Noir Harmony Seal Brown water reactive ink pad and Altenew's Wood Palette stamp.

I used Lawn Fawn's stitch rectangles and stitch scalloped rectangles to create the mat and layer.

15 October 2020

Trick or Treat at the Castle - Lawn Fawnatics challenge #86


Hey there, today I am sharing a card created for the current Lawn Fawnatics challenge #86, the theme is Halloween and Fall. I chose to create a card with 3 super adorable kids treat or treating at the spooky castle.


To create my card, I used the Build a Castle die set, Costume party stamp and die set, Tiny Halloween stamp and die set and the Spooky fence die. All images were stamped onto Neenah Solar White 80lb cardstock.


To ink the background I used distress oxides in Peeled paint, Seedless preserves and Faded Jeans. All images stamped with Memento Tuxedo Black ink and coloured using Spectrum Noirs TriBlend markers; Ornage blend, Fair Skin blend, Burnt Orange blend, Citrus blend, Purple blend, Dull green blend, Pale pink blend, Brown grey blend and Earth brown blend. I also added in BGR5 from my Illustrator collection and a blender pen. I added a few highlights using a white gel pen.


The Tiny ghost were white het embossed on to vellum and die cut. I added some silver metallic splaters in the sky and a few bats fro the Tiny Hlloween set. The spoky fence is a great addition to the scene.

There are still a few days to join in with the challenge, you can find all the details on the Lawn fawnatics blog

Thanks for taking the time to stop by, have a great day.

02 April 2020

Cute Coaster Critters with Lawn Fawn and Spectrum Noir


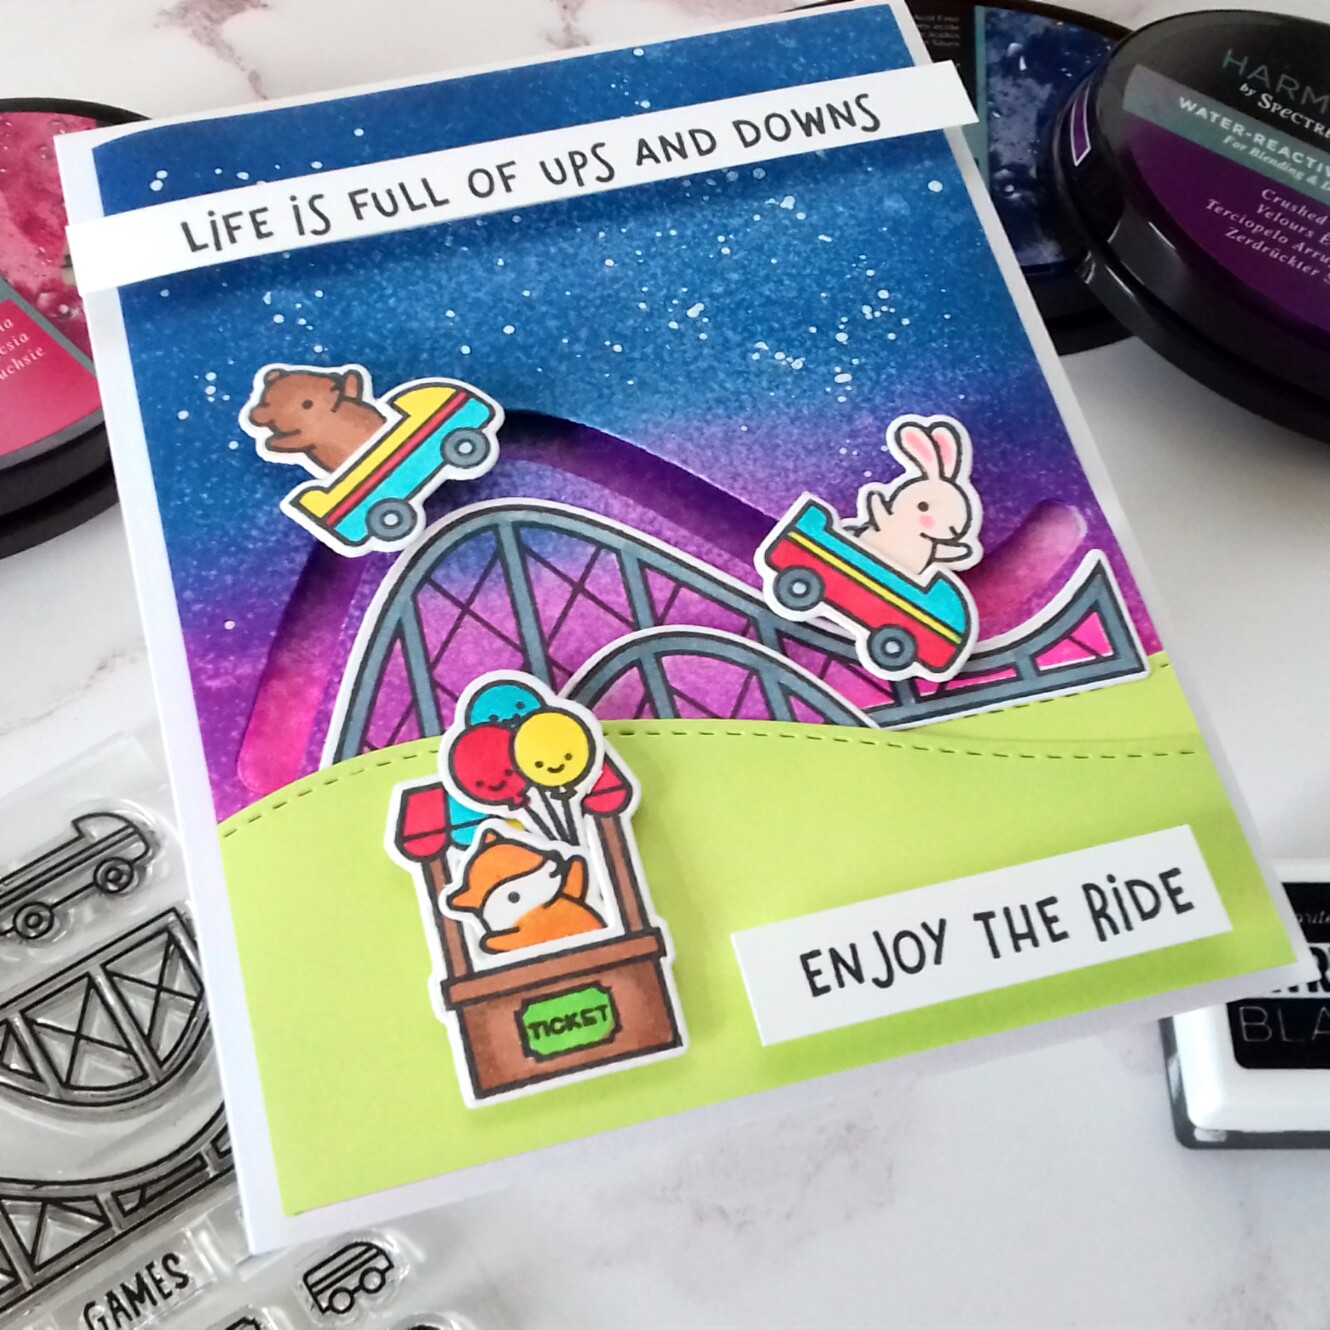
Hey there Crafty friends, How are you all? I hope you are well and not going stir crazy during the Covid-19 lockdowns.  Today I am sharing a super cute card featuring Lawn Fawn's Coaster Critters.

I was lucky enough to get this set as a Mothers day present and couldn't wait to get inky with it.


The stamp set has a matching die set and an add on die, the add on die allows you to create a slider for the little carts, which is adorable. I used the MFT Extreme Black ink to stamp all my images.


Who else saves up their Neenah scraps? That stuff is like gold dust and I can't waste it lol. So as you can see I stamped the images on to my Neenah scraps and then used the coordinating dies to cut them.


Now I'm still new to the whole Alcohol marker thing and I'm not a colourist by any stretch but I decide to dig out my Spectrum Noir Illustrator markers for these image, as they are small it didn't feel to daunting.


As you can see I adde a little shading heee and there, I didnt want to put to much pressure on myself, I just wanted to have fun and make a cute interactive card.


Next I ink blended a piece of Neenah using Spectrum Noir's Water reactive Inks, I used Midnight, Fuchsia and Crushed Velvet, I blend using a cheap foundation brush as this gives me the smoothest the result. Once blended I spritzed with water to soften the look. I also cut and inked some hills using Lawn Fawn's Stitched Hillside Borders, I inked them with Spectrum Noir's Spring Meadow Water reactive ink.


I started to play with the layout of my card, once happy I take a picture with my phone before gluing it all together. I also cut the slide element using the die I mentioned above, it fits perfectly above the large roller coaster element.


To make the coaster carts slde I used 2 of MFT's slider elements, I taped them to a 5p coin with red tape as it's super strong, you need to make sure you trim it back and have no over hanging bits or the slide wont be smooth and could get stuck......ask me how I know lol


Once put together this is how it looks. I am SO SO happy with it, I have swooned over cards like this for a long time and wanted to make similar and now I have.


I can see me making lots more of these style of cards once I expand my craft stash to include lots of cute little stamp sets. I hope you've enjoyed today post, I'd love to hear any feedback.

Tale care, stay home and craft.