29 January 2017

How to make a cute valentines day wreath


Today I am up on the Robins Nest Scrap blog with a simple tutorial showing how to make a cute valentines day wreath.

To get all the pictures and instructions pop over to the blog by clicking here http://chatteringrobins.blogspot.co.uk/

26 January 2017

Sometimes things go wrong but it's how you deal with it that matters


Today I am sharing a card which I created from a project gone wrong. I know we all have those moments where we've put our heart and soul into a project and then a silly mishap ruins it.


For me, I was colouring this image which I had spent a long time stamping, It was a 5x7" background and I had coloured 99% of it and then picked up my Alcohol marker to colour the last bit and wasn't paying attention and ended up using the wrong colour. I was so annoyed and said a few choice words to myself.


I didn't want all my hard work to go to waste and the mistake was to big to cover with a sequin or butterfly so I decided to cut the image up and try something different. 


I still bugs me that it wasn't what I wanted it to be but I think I made the best of the situation, what do you think? I think it's so easy to be self critical and negative and I'm trying a new approach this year, making the best of what you have at the end of the day it's just a piece of card......


I'm off to create something new, catch you soon x


25 January 2017

Creating depth in your project with Vellum


Today I am showing you how to create depth and added interest in your cards using vellum.


I started by creating a background, I did this using water colour over a clear embossed background. Once dry I covered the image with some printer paper and dry ironed it to remove the embossing powder as I wanted a smooth mat finish.  Now I wasn't overly happy with how vivid the colours were but hey Vellum to the rescue!


Next I wrapped the card in Ivory Vellum using extra strong tape to secure from the behind. I love how you see a muted image and instantly want to look deeper into the image.


Using some off cuts from my background I die cut the Happy sentiment and stamped birthday onto a strip of white card, I attached the die cut using glossy accents and the strip with strong double sided tape.


With the remainder of the off cuts I fussy cut some of the flowers and leaves and stuck these to the right hand side of the card. I love the colours and feel of this card. 


Next I mounted the panel onto a 5x7" white card blank and added some Nuvo Jewel drops, They are transparent so work well to pick up on the colours in your project, 


I am so happy with the soft muted look of this project, the detail in the flowers is amazing and just makes me want to smile.


  Here's a list of products I used along with all the links you need to fins them;


I hope you have enjoyed today's Tutorial
Terri x

24 January 2017

Nothing is better than a true friend - Altenew Academy card.


Today I am sharing another card created after taking an Altenew Academy class. This card required me to make a stencil from Altenew dies to ink through and then I added a detailed stamp layer to highlight the flowers.


I started by making my stencil from 200gsm cardstock, the die cuts where more concentrated in the top of the stencil and then more spaced out the further towards the bottom you get so as to give the effect of falling flowers.

I then placed this over my card blank and used 4 shades of ink to create an ombre effect, darker at the top and lightest at the bottom, this also help create a soft floating feeling. Once the ink was dry I used some silver embossing powder and the detail layer of the flower stamps to add more dimension to the card.


I created a sentiment panel using a stamp from the Fresh Freesia stamp set. This was heat embossed in silver and an ombre effect added to tie everything in. I then wrapped some twine around the left hand side of the card placed the sentiment on to foam pads and scattered sequins to finish the look.


Products Used


Using your dies to create a stencil is a great technique to try,, you can also use the same technique to create a die cut panel for the front of your card which you could either stamp through or place over patterned paper.

Thank you for taking the time to stop by, I hope you will come back again soon.

23 January 2017

I adore you teal hearts card


Today I am sharing a card made with teal inks and heart stamps.


I was inspired to make this card after taking an online card class and being set some homework. The homework asked us to make a card using a grid method which was taught in the class.


I opted for teal and heart as they just seem to go together and teal is such a lush colour. I added some sequins and thread to add some texture and also some coordinating vellum.


All of the stamp and ink products used are from altenew.com here's the links to the products in case you want to have a go at making one just like this


I f you are a fan of Altenew then please pop over to the fan group which I run on Facebook, you can find it here Altenew Fan Group.

I hope you like todays project, please stop by for more soon.

22 January 2017

A cute vintage teacup with Altenew products


Today I am sharing a cute vintage teacup card I made with Altenew products.

I used Vintage Roses for the flowers, Beautiful Day for the leaves  Vintage Teacup for the main image,  Green Fields and  Rose Petal inks for the flowers and leaves. I also used the  Artist Markers Set A to colour the cup and saucer.


I embellished with iridescent sequins and clear dew drops.


I placed the panel on to some pink vellum over a white card blank.

I am in love with the colours of this card and can't wait for it to be given to someone and to see there face as they open it.

Thanks for stopping by x

18 January 2017

Kusudama Flower Tutorial

Today is my first blog post during my second term for The Robins Nest and I've got a real fun tutorial to share with you.

Here's a sneak peak


For the full tutorial please visit  http://chatteringrobins.blogspot.co.uk/

16 January 2017

Just be happy - Gelli plate print


I'm sorry I've not posted sooner but I been busy with a million and one things (Dr's, School, Children and DIY to name a few)  I did however manage to grab a few moments to make a little card.

I used some Pebeo high viscosity acrylic paints to take a print from the Gelli Plate, I choose a vivid green and pink, both of which are iridescent. Once dry I stamped my sentiment and image (Visible Image stamps) in  Versamark ink and applied black embossing powder which I then heat set.

I opted for a simple black and white matting and layering combo to set off the imagery.

I hope you like it as much as I do, I thinking I might just pop this into a little frame and keep it close for all those times where life can get to busy and overwhelming and I need a reminder to "Just be happy"

I'll be back Wednesday with a sneak peak at a new design team project

Terri x 

09 January 2017

Even in our darkest moments - Gelli Plate and Visible Image card


Hi Guys, today I am sharing a card made with copper embossing powder. So this year Copper is going to be BIG in craft so I am told, I thought it would be good to use the copper as my glimmer of light in this card.


I created my background using the Gelli Plate and Pebeo paints. I then added my images and sentiments using the Glimmer of light stamp set from Visible Image. I used a Versafine pen to add detailing along the top and bottom of my card. I aslo glazed the light bulbs with Glossy Accents to add a glass effect.


I hope you've enjoyed today's post, take care.
Terri x

08 January 2017

A head full of worries - Gelli Plate and Visible Image card


Today I am sharing a card I created with the Gelli Plate from Gelli Arts and Stamps from Visible Image. I wanted to create a card with a soft dreamy background to reflect the sentiment.


I created the background with Pebeo Acrylic paints and a flower stencil on the Gelli Plate.


Once dry I stamped the sentiment from the No space for dreams in Versamark ink and added black embossing powder and heat set. I stamped the head image in a water based purple ink and then added some sequins and Jewel drop from Tonic studios Nuvo range.


I love the distressed feel of the background, I achieved this by taking 2 mono prints from the Gelli Plate, this was the second, therefor there wasn't so much paint left to lift from the surface, it's definitely a technique I will be using again.

Thank you for taking the time to visit my blog today, 

I will have another Gelli Plate and Visible Image card to share with you tomorrow;

Here's a little sneak 


I hope you'll join me for the full reveal.

Terri x


06 January 2017

The writing is on the wall; Gelli Plate background


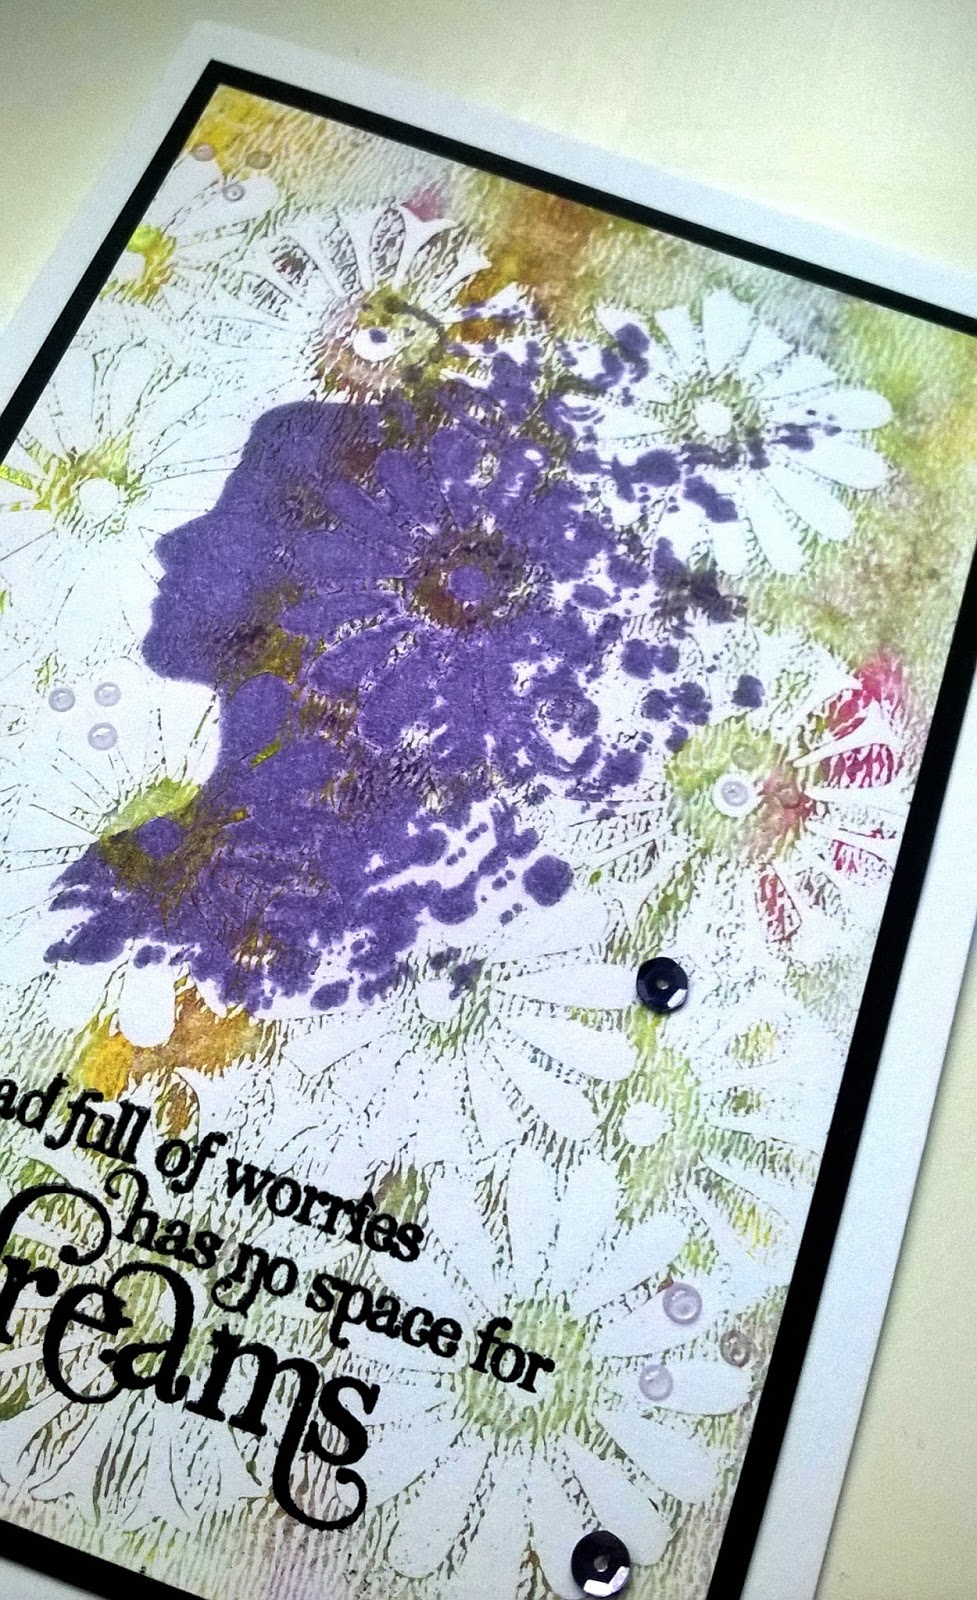
Today I am sharing a card I created using my Gelli Plate and some Visible Image stamps. I wanted to make this card to both show that grunge stamps can create a feminine effect and to convey a poignant message. 
There have been so many high profile deaths in the media in the last 12 months and several of us have also lost loved ones, at times like this I think we all need to be reminded to make the most of our lives and "Live like tomorrow doesn't exist".


To create my background I used my Gelli Plate, a brayer  and some Pebeo paints


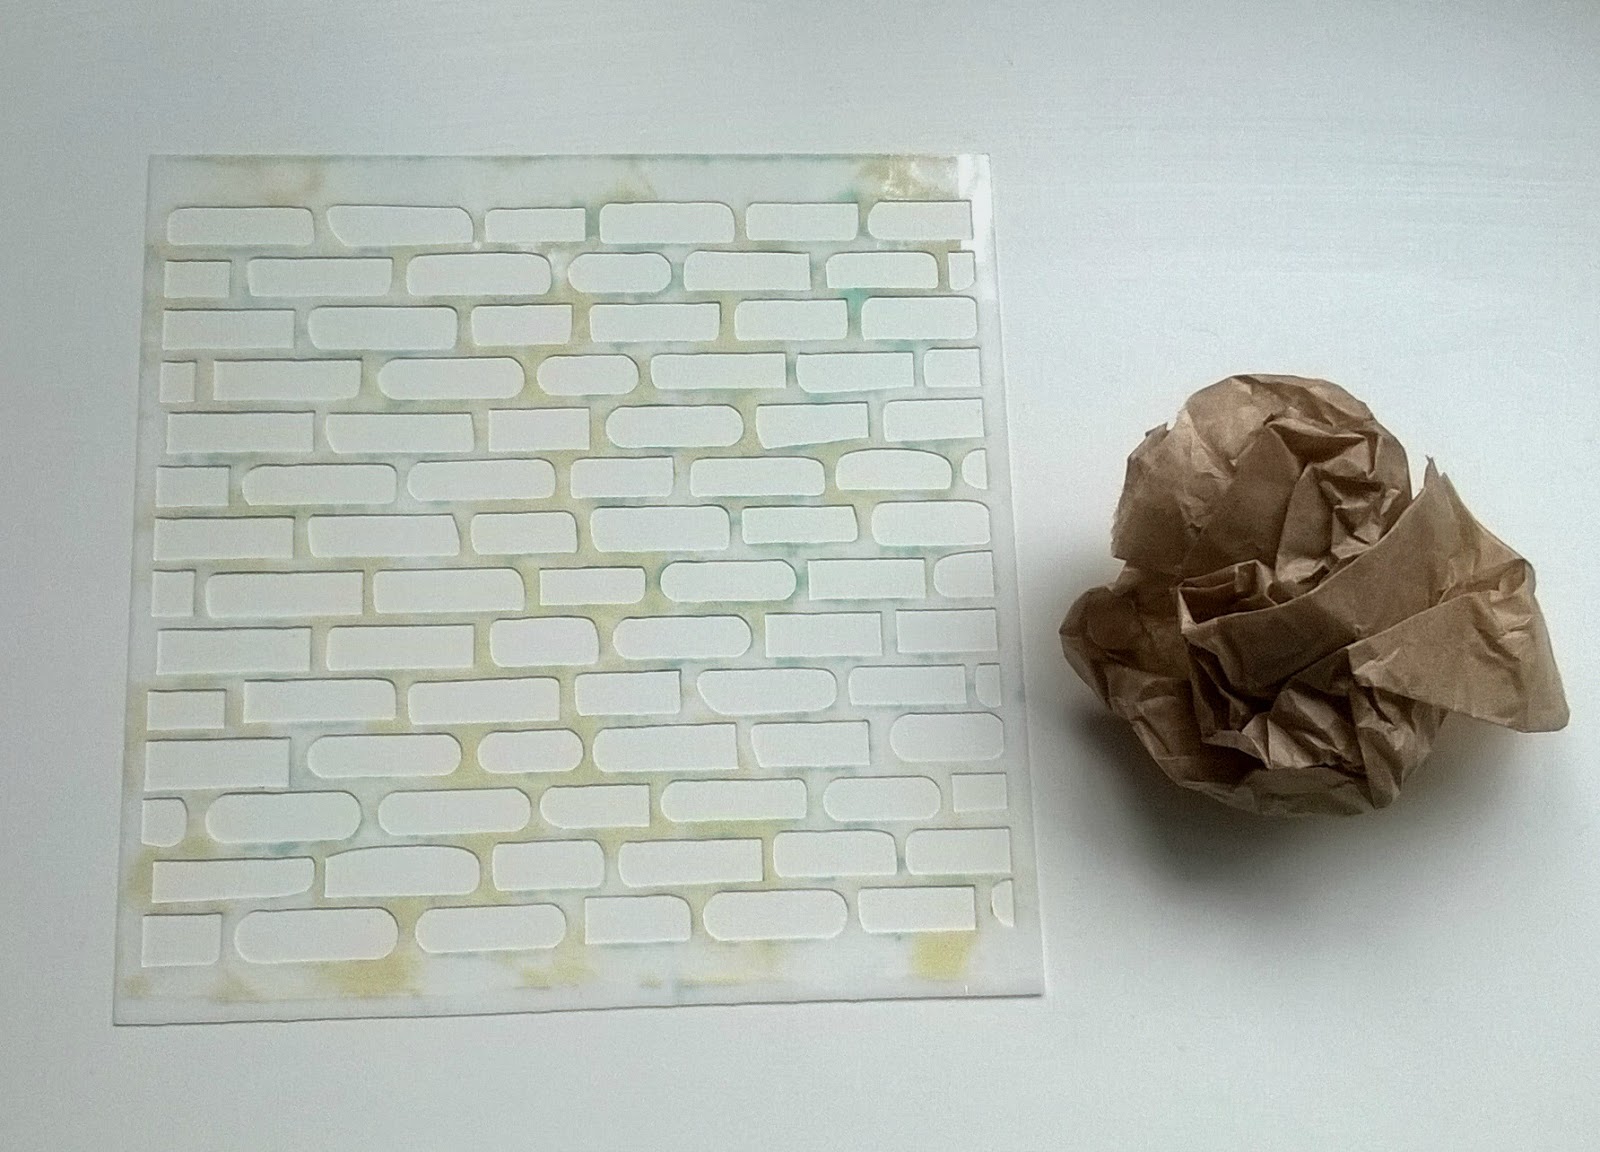
I have used 2 colours of Pebeo high viscosity studio acrylics, Buff Titanium and Iridescent blue green. I love these paints as they are thick and creamy which is perfect for mono printing.


To create the brick wall  I used a stencil and some scrunched up baking paper. I started by coating the Gelli plate with a layer of the Iridescent blue green using the brayer, then I placed my stencil on top. Using the baking paper I dabbed into the gaps to lift some of the paint away, I then removed the stencil and allowed this layer to dry.

Once it was dry enough I added a layer of the Buff Titanium, I then quickly put a piece of smooth white card on to the Gelli plate and rubbed over the surface to make sure I got a clean lift when I remove the card.


Next it was time to add some stamped images and text, for this I used  Visible Images Tomorrow doesn't exist and Ink splats stamps.


I stamped the text on to the off cuts from my background and cut them out and mounted the words on to some foam pads. I like to have a little dimension in my cards.


I added some clear embossing powder over the Ink splats to give shine and reflection. I then distressed the edges of the main brick panel and mounted it on to some vellum and attached it using mini brads. This was then placed on to a white 6x6" card blank.


Thank you for taking the time to stop by and visit my blog, I'll be back soon with another crafty post.

Terri x

05 January 2017

How to use masking techniques in your stamping.


Today I am sharing a video showing how to use masking techniques in your stamping, I have created a cute little thank you card with a Succulent in a teacup.


I hope you've enjoyed  this brief tutorial, feel free to leave me comments below.

Thanks for stopping by.
Terri x

01 January 2017

A place for Altenew Fans to share and inspire


Happy New Year

Wow it's 2017 already, this year I am going to be working hard to fulfil some dreams, one of which is to run a busy and inspiration Altenew Fan Group.

As you may know I am a HUGE fan of all things ALTENEW and enjoy nothing more than an afternoon of craft with their stamps and inks.

If you have a Facebook account you can join me by following this link Altenew Fan Group 


I wish you all a happy and healthy new year, I cant wait to see what it brings for us all.

Terri x