31 January 2019

Altenew don't just do florals!

Hi there, today I wanted to share with you a few cards I've made over the last week or so.  

We all know and love Altenew for their stunning floral stamps and as you are aware I have a large stash of them (Don't tell my hubby) but I have recently started to purchase some of their Character stamps.

These stamps are awesome for men, youngsters and those occasions when you want something a little bit different. 


First up are two cards I've made using the Hug Me stamp and die set.


This set is so adorable, packed with foxes, balloons and heart warming sentiments it deserves place in my crafty stash. I can see many more cards being made with this set in the near future so stay tuned....


I only received this stamp set on Monday and had to use it straight away, it's called Bunny Love and has 6 good sized animal stamps in the set, 4 bunnies and 2 chicks. Perfect for spring time crafting.  This style of card is very different for me, but I love it, those little faces are just too cute.


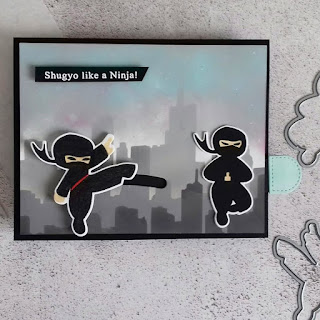
Last up is the Ninja Invasion stamp and die set, this is one of the funnest stamp sets I've used for a long time, there are so many creative possibilities.  


I adore the sentiments and multiple Ninja poses (and yes I have tried to replicate the poses myself, much to my husbands amusement)


The card above is interactive, it has a little pull tab which when pulled makes the Ninja on the left lunge towards the other, so cool!

I am having so much fun with these stamp sets and really hope that Altenew will bring out more in future.  If you are looking for something new to craft with maybe one of these could be your next purchase.

Crafty Hugs, Terri

28 January 2019

3 Ways with - Altenew's Mandala die set

Hi Crafty friends, it's time for another "3 ways with" post.
Today I am focusing on the Mandala die set from Altenew, it's a super die set that has 2 dies allowing you to cut into your card stock or cut out.


I have been using this die for a while now and have come up with several ways it can be used, today we'll look at 3 ways.


Cutting into your cardstock


The die can be used to cut a pattern into your cardstock, I chose to cut into the card but slightly off set, this gives so much added interest to your cards. I used the
Beautiful Heart Stamp Set along with  Gentleman's grey Oval Ink Pads and Shades of Purple Oval Ink Pads to stamp my flower and leaves. The sentiment is also from the Beautiful heart stamp set, I added a few gems and sequins to add a little sparkle.

Creating a shaped card


It's not very often I make a shaped card these days, but when they can be as pretty as this one it has to be done. I used both of the dies to create a shaped, I then stamped flowers and leaves using Garden Treasure Stamp SetGentleman's grey Oval Ink Pads and Shades of Purple Oval Ink Pads


Creating a stencilled background


I love a die that can be used to create a stencil, I cut the inner detail die into a piece of thick card and used some white pigment ink to create a stencilled background for my flowers to sit against. I used the Beautiful Day Stamp SetGentleman's grey Oval Ink Pads and Shades of Purple Oval Ink Pads. The sentiment is from the Beautiful day stamp set.

As I said earlier these are just 3 of the ways this die set can be used, I'd love to see how you use it in your crafting, feel free to tag me on social media.

Have a great week, Terri.

22 January 2019

STAMPlorations Love Hop and Linky Party

Today STAMPloration's are holding a Love hop and linky party and I'm so thrilled to be part of the hop.


I created this cute Valentines card using the Fancy-Frangipanis stamp and Love word die.

I coloured the flowers using Alcohol markers and a white gel pen. I added some gold splatters in the background to add some sparkle.  The sentiment was cut from white card 3 times and stacked together to create a faux chipboard effect. I then added a gold drop shadow and mounted it onto some black card.  I love the effect of thread behind the sentiment as it adds another level of depth and dimension.


The blog hop starts at the STAMPlorations blog here >>> stamplorations blogspot where you can find the detailed  prize info and all the stops.


STAMPlorations are giving away over $100 worth of prizes in the form of products, gift certificates, and coupon codes.

From January 22 to February 14, products in the LOVE/SPRING section are 15% off (no coded needed) but as an added bonus if you use my DT code STAMPGIRLTERRI, you can get an extra 20% off.

21 January 2019

3 Ways with - Embossing 3 ways with Altenew's Sunburst stencil

Hi everyone, welcome to the second instalment of  "3 Ways with". 

Today I am focusing on ways to emboss with stencils, I have chosen to use the Sunburst stencil from Altenew as it works for all occasions.


We all know that stencils can be used to ink through but I like to get as much from a product as I can by stretching it's use. So today I'll be embossing 3 ways.

Embossing Paste


First up is Embossing with embossing paste.  I like to use a clear embossing paste and colour it myself using items from my craft room.  For this card I used some very fine glitter along with the clear paste. I just mix it up on a glass mat with a palette knife and then spread it through the stencil.


You could use spray inks, mica powder or ink from an ink pad to colour the embossing paste. I also spread some of the glittery paste onto some white card and let it dry, I then cut the sentiment from it to create a cohesive look.

N.B You could use texture gel, soft relief paste or another medium to try this technique.

Dry Embossing


Dry embossing work in the same way as embossing folders, the fibres of the paper/card get stretched as you pass the project through your die cutting machine.  To dry emboss with a stencil you will need the correct plates for your machine and also a embossing mat, sometimes called a tan mat.

N.B if you don't have an embossing mat don't worry, you can use some craft foam for this technique.


Another little tip here is those cute splatters in the background, they have been embossed too. I flicked some water at the card (yes that's right you can emboss with water) and sprinkled some embossing powder on top before heat setting.

Embossing Powder


Embossing powder and stencils, who would have thought? I know I didn't invent this technique but I love it so much I had to share it with you.


I secured the stencil to the card using washi tape, I then take an embossing ink and pounce/dab it all over the surface making sure to get in the negative space of the stencil. I then used a combination of 3 metallic embossing powders to create this super cool look. 

N.B keep any of the remaining mix of embossing powders in a little screw top pot to use another time.


The products I used today are listed below


One last tip - When securing your card and stencil add some low tack/ washi tape to the reverse of the card and onto the stencil, this holds everything more securely than putting the tape on the front. When removing the tape pull at a 90 degree angle to minimise tearing of your card stock. If it's causing you any problems, gently heat with a heat gun to loosen the tackiness.

That's all from me today, See you again soon.

Altenew Educators Blog Hop Winner Announcement.

Good morning all, Thank you all so much for the wonderful comments you left on my blog hop post, I loved reading all the comments and am so glad you enjoyed the cards I shared.

Without further ado the winner of the $15 gift card is 


Congratulations Dana please email me at tkoszler@yahoo.co.uk for details of how to claim your prize.

Later today I will be sharing the second instalment of my new series 3 Ways with, Where I'll be showing 3 different embossing techniques using Altenew stencils.

Have a fab day

18 January 2019

Altenew Educators Blog Hop +Giveaway


Welcome to Altenew Educators Blog Hop!  As Altenew-Certificated Educators, we were asked to share our FAVORITE ( techniques, styles.... or Altenew supplies)! If you’ve been following along, you’ve just arrived from Michelle Ochoa Murray's blogIf you find a broken link, you'll find a master list of the hop links at the Altenew Card Blog.

I thought I'd share with you two cards using one of my favourite techniques, pairing delicate flowers with backdrops consisting of black and white elements. I love the fresh modern vibe it creates.


For my first card I used the Watercolor stripes cover die to create a black backdrop for my flowers to sit against.  I added floral elements using the Bride to be stamp and die set. I chose to use pastel inks to give a soft feminine feel. My sentiment is from the Hope stamp and die set.


My next card was created using the same idea, this time I used the Layered Medallions A cover die cut in white against a black card. I used the Fine Alphabet to die but the word Hugs, which I placed on to vellum.


As many of you will know, Altenew is a huge part of my crafting life, I'm not only a huge fan, Certified Educator but also run the Altenew fan group on Facebook, I just can't get enough of their stunning products.

When I first heard about the AECP I was ready to jump in with both feet. The program was a way for me to learn new techniques, ways to get more form my Altenew stash and take my crafting to the next level.

I adore Altenew's stamps, inks and dies (well in fact all of their products) They make such a difference to my crafting, if you are thinking about joining the AECP, I would say go for it. You have nothing to lose and so so much to gain. The lessons are full of hints, tips and inspiration and the support from Virginia who runs the program is fantastic.

I hope you will join hop along and see what the all of the other ladies have to share , below is a list of all the stops. Your next stop is Maryam Sharara

Hop participants;


Prize Info

Altenew is giving away $30 Gift Certificate to THREE lucky winners! Please leave a comment on the Altenew Card Blog by Jan. 23rd for a chance to win. Three winners will be announced on the Altenew blogs on 1/25/2019.

I also have a $15 gift certificate to give away, please leave me a comment below and I will pick a winner at random and announce it here on 1/22/2019.

Thank you for stopping by today, take care, Terri.

14 January 2019

3 ways with Altenew's Sunlit Flower card making kit

Happy Monday Crafters, Today I am launching a new series on my blog called "3 ways with"

Today I am sharing 3 cards created with the Sunlit flower card making kit from Altenew. The kit is jam packed with a whole host of goodies to create stunning cards, If you've not got any Altenew items in your stash this kit is a perfect starting place.


The kit has, a layering stamp set, a layered butterfly die, an ink pad, 3 Artist markers, cards, envelopes and an inspiration guide.


I have made 3 cards using 3 different techniques, Layered stamping, Simple watercolour and colouring with Artist markers. Of course I used some items from my stash and will link to them for you.

Layered Stamping


I started by stamping all of the elements onto masking paper and fussy cut them in order to be able to create a floral composition.  I stamped the flowers and leaves using the black ink included in the kit. I used several coloured inks from my stash to add the layered colours to the flowers, I choose Coral BlissPink PearlWarm SunshineSunkissed and Caramel Toffee crisp inks.  I used the stamp which normally adds the centre to the flowers to decorate around the floral display.


Simple Watercolor


Next up is my simple watercolor, and when I say simple I really do mean simple.  I literally just stamped out the flowers, heat set the ink and then added some watercolor using the 36 pan watercolor set. I fussy cut the flowers and added foam pads to give dimension. I used some of the leaf and spring stamps to add more shape to the design, I stamped these direct to one of the cards in the kit. I added a heat embossed sentiment and some inky splatters using Antique gold and Coral Berry spray inks to finish the card.

Colouring with Artist Markers


For my last card I wanted to show how you can use Altenew Artist markers to give a cute look with no experience with using Alcohol markers.  Once again I stamped out my floral display using the mask I made earlier.  

 I opted for pink and yellow tones to colour my flowers.  I used the inspiration guide to see where the darker areas on the flowers would be. I used the darker shade of pink or yellow depending on which flower I was colouring and added little flicks of color from the base of the petal to about half way up, it's important to turn your card so that you are flicking away from you each time you color a new petal.  I then use the lighter shade to flick in the same way this time going from the base of the petal to about 3/4 of the way up the petal.  You can use 3 shades of a colour if you prefer a fuller petal.


I hope you like the cards I've shared today, please pop back soon for more crafty eye candy.


04 January 2019

Paperbabe Stamps challenge #90

Good Morning crafty friends, Happy New year.

Today is the start of a new challenge over at Paperbabe Stamps blog, the theme this time is
"New" (fresh start)

I love new things, but at this time of year I am always looking forward to spring (early I know) and planning my garden. I chose to make a card with flowers and a garden themed quote.


I lightly inked through the stencil with distress oxides to give a faint polka dot background.  I stamped the roses and leaves onto super smooth card with water based inks, I love the soft airbrushed look it gives.

I fussy cut the flowers and leaves and adhered them with foam pads. I stamped and heat embossed my sentiment in black to make it pop.  I also added 3 little butterflies to complete the look.

I hope you will be joining in with the challenge, you could even win a prize from the super talented and generous Kim aka Paperbabe herself.

I can't wait to see what you create.

03 January 2019

STAMPlorations January CAS Card challenge


Happy New Year guys, today is the first CAS card challenge of 2019, the theme is as always anything goes, but the optional color twist is Burgundy.


I put together my DT project using one stamp set and one ink pads, simple and easy to do. I stamped all of the images from the House Extras stamp set using a Burgundy water based ink pad. I then used a water brush to pull the color out and add some shading. In some places I created a wash of color.


I love how this card turned out, it reminds me so much of the picture in the Charlie and Lola books by Lauren Child, my children loved them when they were little.


To join in with the challenge visit the link below


I have a discount code for you to use on the STAMPlorations store which will entitle you to 20% off your order, this can not be used with other discount codes

Use>>>>>>  STAMPGIRLTERRI when checking out at http://stamplorations.com/shop/