Showing posts with label 3 ways with. Show all posts

19 August 2019

3 ways with Altenew's Playful Pulmeria


Today I am sharing 3 cards using the Playful Plumeria stamp and die set from Altenew. This set was part of Altenew's August release, it's a stunning set and is easy to align the layers.


For my first card I decided to use the stamps and die together. I started by lightly inking my card panel using the Broken chevron stencil and some cotton candy ink.  I then stamped and die cut the flowers, leaves and branch.


For the leaves I used Limeade and Lime ink, I love how zingy the leaves look. I stamped the sentiment in Dark chocolate ink and added some inky splaters in the same colour. When putting the card together I slightly curled the leaves and used foam tape to add the folowers.


In my second card, I chose to use the stamps and dies again but didnt use the branch. I love how versatile this set is, you can create somany different styles. I stamped the flowers and leaves on to Solar crest card and then die cut them.


Before adhere the flowers and leaves I added some black inky splatterss to the card base and then adhered a Mid century frmae die cut. Again I used foam tape to add the die cut elements to give some height. I stamped the sentiment onto card and added a inked edge to help it stand out.


For my final card I decided to use only 2 layers of the flowers and leaves and add doodeled details.  I love a one layer card (cheaer postage and quicker to create) but sometimes they need a little extra something, and thats where the doodles come in.


I stamped 3 of the flowers and added 2 leaves per flower, I then doodeled around the flowers with a black fineliner pen. I added splatters of the cotton candy ink in the back ground to soften the white space. I felt like the flowers needed a little more detail so added 3 tiny AB gems tothe centres. 


Here's the links to all the products used in todays post

Playful Plumeria stamp set
Playful Plumeria die set
Broken Chevron stencil
Four scoops mini ink cubes
Spring Bouquet mini ink cubes
Mid centurary frame die
Obsidian Black ink
Solar Crest card
Mini Blossom Die Cutting Machine

***My links to Altenew products are affiliate links, this means that I get a small commission from Altenew for each purchase made, this does not cost you any more, however it helps me be able to create more content and share inspiration.  I truly appreciate any purchase made using my links.***

14 August 2019

3 ways with Altenew's Leaf Canopy stamp and die set


It's time for a new episode of "3 Ways with", this time its the turn of the Leaf Canopy stamp and die set from Altenew.  As always I have 3 projects to share, todays projects show 3 ways to use the stamp and die set but are also coloured with 3 different mediums.


My first card uses just the Leaf Canpoy Stamp set. I stamped the images onto Solar crest card using an alcohol friendly inkpad. I then used Altenews Artist Markers to colour the leaves. I'm not a great colourist so I just use little flicking motions to add the colour.


I used the the Hello die from the Envelope liner die set to cut the sentiment on this card. I didn't have the right colored card so I used one of the markers to color the card before die cutting it, its a greate way to make sure your projects coordinate well.  I then added a little border with a black fine liner.


In this next card I have used the die set to cut the Leafy sprigs out. I started by stamping the images and then watercoloring them using Altenews 36 pan set. I used the same colours as in the first card but while still wet I added some rock salt onto the card, this pulls in the colour and creates lovely effects.


Once dry I die cut the sprigs and added them to a black card usign foam tape. I cut the hello sentiment from the same water colour card as the sprigs, I did this 3 times and glued them together to create a thick sentiment that gives my card height.


For the final card I used a partial die cutting technique, you can see a step by step on my Instagram highlights (I will do a video in the future)  I used solar crest card and started with the large die, I cut roughly halfway up the card and die, this gives a really cool effect.


I then stamped the image over the die cut shape and used Altenew Ink cubes to add colour. As I wanted each leaf to be one colour I chose to use a finger dauber to add the ink to the stamp so as not to contaminate the colours. I actually stamped each leaf seperatly, it didnt take too long though. Lastly I added a black sentiment and mounted the stamped die cut panel onto a black card.

Here are the links to the products used in todays post

Leaf Canopy stamp set
Leaf Canopy Die set
Envelope Liner die set
36 pan Watercolor set
Puffy Heart Ink
Rocky Shore Ink
Volcano Lake Ink
Artist Markers Set D

***My links to Altenew products are affiliate links, this means that I get a small commission from Altenew for each purchase made, this does not cost you any more, however it helps me be able to create more content and share inspiration.  I truly appreciate any purchase made using my links.***

29 July 2019

3 Ways with Altenew's Rosie Posy stamp set

Welcome to a new episode of "3 Ways With", today I am focusing on the Rosie Posy stamp set from Altenew. This is a super cut 2"x3" stamp set which comprises of a floral cluster and a mini sentiment.


As always I have 3 projects to share, each of them this week feature the Rosie Posy used in a different way. Lets jump right in.


 Clean and simple background


For my first card I used the Hello sentiment to stamp a simple background in Obsidian black ink, I love the modern feel this gives. I then stamped the floral cluster twice onto some Solar Crest card with the Obsidian ink.


Using Coral Bliss Crisp ink and a wet brush I added colour to the rose, I did the same using Evergreen ink for the leaves. Once dry I fussy cut the images.


I added the floral clusters to my card using foam tape. I then stamped and cut a sentiment from the Sentiment strips set to finish my card. This card is one of my all time favourite makes. I think it's the clean and modern feel that speaks to my soul.

Embossed Resist


I'm a big fan of embossed resist and ink blending techniques and decided this set was the perfect size to create a background panel with them.


Working on Solar Crest card I stamped and heat embossed the floral cluster several times using the Clear embossing ink and Crisp white embossing powder to give the look of patterned paper. It's important to remember a few things when doing this.... First always using an antistatic bag/ some corn starch or baby powder to avoid embossing powder sticking where you don't want it.  I never stamp in the centre of the card as this looks to forced and lastly, stamp off the edges of the card, this really does make it look like you've used a patterned paper.


To create my ombre background I started blending the Ink from lightest to darkest to avoid contaminating my blending tool.  I used Pearl Pink, Coral Bliss, Crimson and Velvet inks. I always do the inking twice to get a smoother look to the blend. I added sentiments from the Rosie Posy and Sentiments strips stamp sets on white card to finish the card.

Focal Image


On my Solar Crest card  used Coral bliss ink and the Broken chevrons stencil to create some background interest, I didn't want a full background, I like having the pattern fade out near the outer edge of the card.


I stamped and coloured 3 of the floral clusters and coloured them in the same way I did in my first card. I enjoy fussy cutting and this image i easy to cut so took no time at all.


I added 3 of the clusters in the centre of the card using wet glue. I only put glue in the centre of the image and as it dries the edges of the image lift adding dimension to the card. I stamped the Hello sentiment in Obsidian black ink onto white card and adhered it using foam tape.

If you've not tried the obsidian ink I highly recommend it, it gives such a crisp result and is perfect for any water colouring techniques.


Here are the links to the products used in this post

Rosie Posy Stamp set
Sentiment Strips Stamps
Broken Chevron Stencil
Clear Embossing Ink
Pure White Embossing Powder
Obsidian Black Ink
Solar Crest Card
Pink Pearl Crisp Ink
Coral Bliss Crisp Ink
Crimson Crisp Ink
Velvet Crisp Ink
Evergreen Crisp Ink

***My links to Altenew products are affiliate links, this means that I get a small commission from Altenew for each purchase made, this does not cost you any more, however it helps me be able to create more content and share inspiration.  I truly appreciate any purchase made using my links.***

22 July 2019

3 ways with Altenew's charming doodles stamp set

Hello and welcome to a new "3 ways with" post. Today I am focusing on the Charming Doodles stamp set from Altenew. As always I will be showing you 3 projects all created with the same set but different looks, lets jump right in.


Water coluring using mini ink cubes


I  decided that today would be a fun time to colour using my mini ink cubes as it's quick and easy to do. I started by masking off the area where I wanted my sentiment to be using some sticky notes. I then used the Obsidian black ink to stamp all of the outline images to create a cute composition.


I then Used the following inks Heart Beat InkCoral Bliss InkMoss Ink and Frayed Leaf along with a wet brush to add colour to the images. I added some splatters using the Heart Beat ink and then used my heat tool to dry everything off. Once I removed the sticky notes I used a fine liner pen to add two lines above and where my sentiment would be stamped.  The sentiment is from the Better Together Stamp set.


Base layer stamping


For my second card I chose to use only the base layer images from the Charming Doodles Stamp set, this give such a contemporary look.  I stamped the sentiment from the Mega Greetings 3 stamp set in Obsidian black ink.


I used Fresh LemonParrot and Coral Bliss to add flowers and leaves around the sentiment. The great thing about the Obsidian ink is that even when you over stamp it with a dye ink it doesn't smudge or lose any of it's crisp look.


Stamp layering


The Charming Doodles set almost feels like two sets in one in terms of the looks you can achieve, the sketched outlines are so cute and delicate but the layers are bold and impactfull. Couple them up and you have an awesome image. 


I stamped all the outlines in Obsidian Black and then used BlushRougeCoral Bliss and Forest Glades.  I then added a sentiment using the Sentiment strips stamp set. I love this card, it reminds me of the wild flower area in my garden, so delicate and free.

Thank you for stopping by and taking the time to check out my projects, Please do come back tomorrow as I have something HUGE and EXCITING to share, and I'm almost ready to burst.


***My links to Altenew products are affiliate links, this means that I get a small commission from Altenew for each purchase made, this does not cost you any more, however it helps me be able to create more content and share inspiration.  I truly appreciate any purchase made using my links.***

08 July 2019

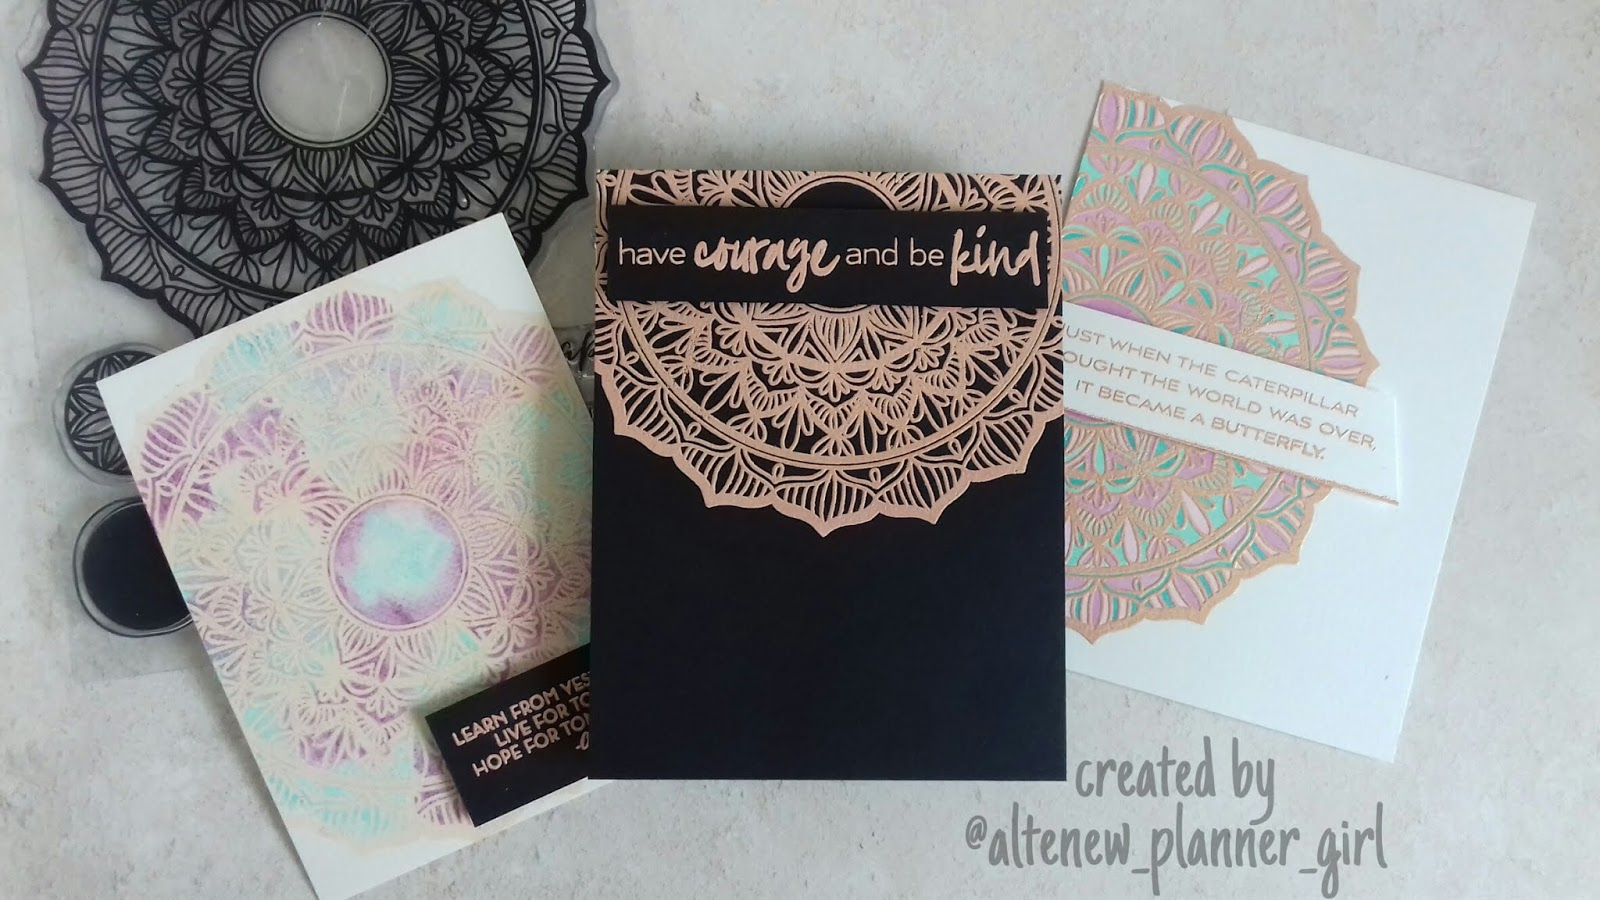
3 Ways with Altenew's Pen Sketch Mandala Stamp Set

It's Monday and time for another 3 ways with post, today I am focusing on the Pen Sketch Mandala Stamp set from Altenew.


Those who know me well, know that I love Mandala's and as soon as I saw this stamp set I knew it would be making regular appearances in my crafty projects. So let's jump in and I'll talk you through this weeks cards and all the techniques I used.


Watercolour with Embossing power resist


I love to used embossing as a resist for watercolour and thought it would be fun to play with the Mandala and see what I could create.  I started by stamping the Pen Sketch Mandala on some Hot Pressed water colour card, I chose to use hot press card as it is smoother and allows for a better emboss.

I used the Golden Peach Embossing powder from Altenew along with their embossing ink which gave a lovely base for me to add colour. Once it had cooled I thoroughly soaked the card stock and dropped in some water color  and allowed it to bleed.


When the card had dried I decided that I didn't want the bold embossed lines so did a little trick to remove them.....Yes, you can remove embossing powder using an Iron and some Printer paper.  I set my iron to a medium heat and turned the steam function off. I then place the printer paper over the to and gentle run the Iron over the surface.  This melts the embossing powder and the paper soaks it up.

To my surprise (as I've only ever done this with clear embossing powder) it left a light peach colour where the embossing powder had been, it looks very vintage/distressed and I LOVE it!

Alcohol Markers and Embossing Powder


Now I dont know if you've ever tried colouring a heat embossed image with Alcohol markers only to find that they melt the powder and it ruins your project, well I have and it drives me crazy.  Also if you want a light embossed line and darker colouring it's almost impossible to do in the normal way of embossing and then colouring.

So I got to thinking, how about I use my stamping platform and stamp my image in a light alcohol proof ink, colour it with markers and then heat emboss....genius right? I imagine lots of people do this but I wanted to share the idea for those who dont.


I found that a light grey alcohol proof ink worked well to give me a guide for my colouring. I made sure to leave the stamp in the stamping platform so that I could put my card back in the exact place and emboss over the stamped lines later.  This worked so well, and as the heat embossed lines are a little thicker they hide and stray pen marks,


Sorry that the lighting in the above photo is a little dark but it was so hard to try and capture the shine of the embossing powder. The sentiment comes from the Wings of Hope stamp set.

Clean and Simple


My last card is so quick and easy but looks very elegant.  I love a clean embossed image on black card, I kept with the theme of Golden Peach Embossing.  Now a anti static bag is a must when heat embossing but especially important when embossing on black as every stray particle shows up.

If you don't have an anti static bag you can easily make one at home by adding wither corn flour/startch into a piece of muslin or a stocking, or if your in a rush you can  just sprinkle some baby powder onto your card and used a soft brush to swipe it over the surface.


I hope you've liked to days post, I will be back next week with something new but until then all thats left to say is, links to the products used are below for you to use

Products Used

Pen Sketch Mandala Stamp Set
Wings of Hope Stamp Set
Golden Peach Embossing Powder
Embossing Ink
Watercolor Brush Markers - Spring Garden Set
Artist Markers - Set D


***My links to Altenew products are affiliate links, this means that I get a small commission from Altenew for each purchase made, this does not cost you any more, however it helps me be able to create more content and share inspiration.  I truly appreciate any purchase made using my links.***

25 June 2019

3 Ways with Altenew's Pattern Power stamp set

Good Morning Crafty friends, it's a cold wet day here and I'm fighting off a virus, so feelign a little rubbish to be honest, hence the reason why this post didn't go live yesterday.....

Anyway less of my moaning and more about today's 3 Ways With post.  I have created 3 cards using the Pattern Power stamp set from Altenew's June release.


The Pattern Power stamp set is such a fun set, packed with Geometric optical illusion image and a couple of funky sentiments. I feel this set is going to be my go to set for male and teenager cards and for creating fun backgrounds.


My 3 projects today feature 3 of the patterns used as backgrounds. I thought it would be good to showcase the different looks you can achieve, so let's get started with the first card.


I deided to work with a grey, white and pink pallete this week and wanted lots of white space in my projects. The triangle patter was stamped in pink and grey to create a panel down the centre of my card.

I wanted to keep and additional images simple so opted for the Mega A die cut in white with a black shadow beneath.  I added the word amazing using the lable love stamp set and a few enamel dots to embelish.


I dont know why but I felt like adding some hand sketching details to the cards in black fine liner, I think it actually ties the whole look together and adds a fun feel......do ou agree?


For this next card i used the faned scallop pattern, I used pink ink in 2 shades to stamp across the card.  I added a black outer edge to the stamped pattern (not very even but I'm trying lol)


I added a peony using the 3D Peony Dreams die set, I cut all of the layers in white card and the base layer for the flower and leave from black. The black shadow layer helps the flower to not get lost on the white card and ties the black sentiment in to the card.  Teh sentiment is from the Better Together stamp set.


My last card features the faceted triangle pattern stamp, I have to say I think this is maybe my favorite pattern so far.  This time I used 2 sahdes of pink and 1 of grey to create the pattern. It stamps really well and matching the pattern up is easy.


I added a black fine line around 2 edges of the stamped triangle and added a couple of dots at the of each line, I think it's a bit arty and fun....  My sentiment was cut using the bold alpha dies, I cut each letter twice in white and once in black and adhered them with wet glue. I also added enamel dots from the new day card kit to finish.

There you haev it, "3 Ways With" Altenew's Pattern Power stamp set. I hope you enjoyed todays post, I have a few mroe cards using this stamp set on my instagram grid for a little more inspiration.

Here's the linsk to products used in today's post


Pattern Power Stamp Set
Mega A Die
Bold Alpha Die Set
3D Peony Dreams Die Set
Label Love Stamp Set
Better Together Stamp Set
New Day Card Kit Enamel Dots
Baby Pink Crisp Ink
Fuchsia Crisp Ink
Limestone Crisp Ink
Silver Lake Crisp Ink

***My links to Altenew products are affiliate links, this means that I get a small commission from Altenew for each purchase made, this does not cost you any more, however it helps me be able to create more content and share inspiration.  I truly appreciate any purchase made using my links.***

17 June 2019

3 ways with Altenew's Peaceful Reverie

Welcome to this weeks "3 ways with" post. Today I am featuring the Peaceful Reverie stamp set from Altenew.


The Peaceful Reverie stamp set was released this month and has become one of my all time favorite stamp sets!  The set consists of 4 flowers and 2 leaves, each image has a solid base layer and then a detailed layer, this layer is designed in a pointillism style.

It can be used in so many ways to create stunning projects. Here I show you 3 ways, using the base layer alone, the detailed layer and then both layers together. 


For the card below I decided to start out with the base layer, using solid images and tones of beige and brown.  I added a vase using the Versatile vases stamp set and the matching mask/stencil.  I sponge ink through the stencil to create an ombre effect, I think it looks like frosted/smokey glass. I then stamped the vase over this.


To add the stamped flowers and leaves I cut some masks to allow me to layer my design up. I decided that I wanted the darker images in the foreground and the leaves lighter behind. On the 2 main flowers int he front I used a brown pencil define the petal a little. I also added some inky splatters with Brown ink and the Crisp white ink spary.


For my next card I worked on Neenah dessert storm card stock and used just one ink colour for stamping. I love how delicate the detailed layer of the images looks by itself. It's such a soft, feminie look.


I added a sentiment from the Versatile Vases stamp set and some inky splatter with the Crisp white ink spray. As I wanted the splatters to be small and not overpower the card, I unscrew the cap from the ink and tap the plastic tube onto my glass cutting mat and then use a tiny paint brush to create the splatter.


My final card uses both layers for the floral images, showing the detail and shading of the flowers.  I started by stamping the base layers of the flowers in Vanilla Cream ink before adding the detailed layer in Almond Butter ink.


I stamped the leaves using the Almond butter ink to tie the whole look together. This card has a real vintage feel so I wanted to keep it simple and add only a tiny amount of ink splatter an a simple sentiment, again from the Versatile Vases stamp set.


There you have it, 3 ways with Altenew's Peaceful Reverie stamp set.  I am really looking forward to seeing what other people create with this set. If you do share any makes on social media please use the hashtag #altenewpeacefulreverie so that I can see your creations. Below are the links to products used in today's post.


Peaceful Reverie Stamp set
Versatile Vases Stamp set
Versatile Vases mask/stencil
White spray ink
Coffee Break inks
Delectable delights inks

***My links to Altenew products are affiliate links, this means that I get a small commission from Altenew for each purchase made, this does not cost you any more, however it helps me be able to create more content and share inspiration.  I truly appreciate any purchase made using my links.***