31 December 2017

All about layering 2 - Altenew Educator Certification Program

Hi everyone, I'm back with another project inspired by one of the Altenew Academy classes.

I just finished the second course which is all about layering 2, I decided to use my brand new stamp set Winter rose which I received for Christmas from my husband.


I love this set as it's a very loose layering set and gives a kind of screen printed look.


I chose to use Rose Quartz, Puffy Heart, Purple Wine and jet black ink for my flowers. I stamped 3 flowers using a basic masking technique and then added in some leaves using Silver stone crisp dye ink.


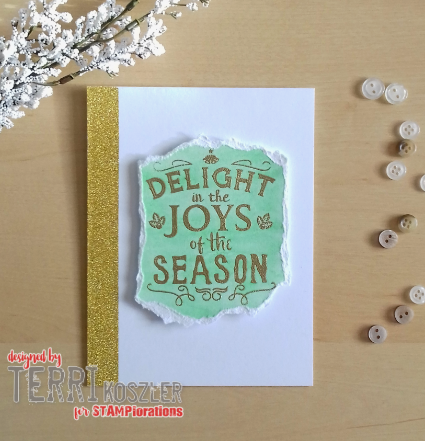
I placed a strip of pink glitter washi tape along the bottom edge of a card blank and added my stamped panel using foam pads. 

I added 3 black sequins and a sentiment stamped in black ink to tie the look together.


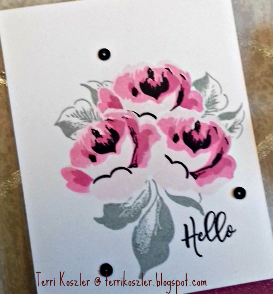
I enjoy using layered floral stamps as they give such a pretty look.

Here's the links to the items I used


Thank you for taking the time to stop by today.

30 December 2017

All about layering - Altenew Educator Certification Program


I am pleased to tell you that I have been selected as part of the first intake for the Altenew Educator certification program.

The program has two levels and each requires you to take part in academy classes and create a project to submit. Once all of the first levels projects have been submitted and approved there is another challenge..... Once that is passed I can move onto the next level.

I can't tell you how excited I am. I have been watching the course videos making notes and practising techniques before I jump in and make my projects to submit.


Over the next few weeks I will be sharing projects I create as part of the course and hope you'll enjoy seeing them.

I thought I'd share my first project with you


My first card that I created is from the Altenew Academy class All about layering.

This class is a fantastic starting point if you are looking to get into creating with layered stamps, it's also one of the 10 classes need as part of the Educator certification program.


I created my card using one of Altenews simple layering sets, although the stamped images dont go on top of each other you still need to understand placement, use multiple stamps to make your image  and have a good eye when stamping.

I started by stamping the main body of the camera image on to white cardstock using Jet black ink, I then added the detailed layers using Mountain Mist and Rose quartz inks.


I fussy cut the image and set it aside. I wanted to add some stars that will sit behind the camera and radiate out, this helps to ground it. I used a tiny star from the Baby Zoo stamp set. I placed the camera image on foam pads and adhered it to a panel of white card.

I then stamped my sentiment under the image. To prepare my 4.25" x 5.5" card I added washi tape down both edges. I then adhered my panel using some foam tape for added dimension.


Here are links to the products I used


Jet Black Crisp Dye Ink

Thanks for stopping by today, Please let me know what you think of my card in the comments below.

21 December 2017

STAMPlorations CAS Card Challenge - December reminder

We are half way through the month so it must be time for a reminder of the December CAS card challenge.


I have created a cute Christmas card to help spark your creativity


I used the Trendy-Christmas-Trees stamps along with the Celebrate-Word-Die to create a simple card.


To join in with the challenge visit the link below


I have a discount code for you to use on the STAMPlorations store which will entitle you to 20% off your order, this can not be used with other discount codes

Use>>>>>>  STAMPGIRLTERRI when checking out at http://stamplorations.com/shop/

18 December 2017

Believe in the magic of Christmas


Good morning everyone, today I'm sharing another Christmas card made with Altenew stamps, dies and stencils.


The flowers were stamped and die cut using an Altenew stamp bundle that came free with a magazine last year.

I added a stencilled background using the Sketched lines stencil. I then stamped and die cut some foliage using the Poinsettia and pine stamp and die bundle. I used Peeled paint distress oxide ink as this allowed me to then use a water brush to move the ink around a little.

I drew a circle on the card in pencil and arranged my flowers and foliage into a wreath shape. I wanted to add a sentiment in the same colour green that I had used already; so I used a piece of card which I coloured with the Distress Oxide ink and then sprinkled with clear embossing powder and heat set.  Once cool I used the Believe form the Holiday script word dies to cut my coordinating sentiment.

I love how the browns and greens look together along with the florals and modern stencilled background.

I hope you like todays project, I'll be back again soon with more crafty projects. 

16 December 2017

Christmas card fun with Altenew


I can't believe that there's less than a week until Christmas and I still have a few cards left to make.
Are you prepared yet or are you a last minute crafter?

Today I am sharing 2 cards that I made to send to friends and family, all the stamps, dies and stencils used are from Altenew.


My first card is a CAS card using the Majestic Mistletoe stamp set, Holiday script word dies and the Holiday wishes stamp set.

I stamped the mistletoe using Distress oxide ink, then I cut my large sentiment from Gold linen card and stamped the word Christmas in black ink.  I added some Nuvo drops to embellish and highlight the sentiment.


I started by using the tiny bubbles stencil and some distress oxide ink to create a subtle background, I like the faded look that just takes the edge off the mass of white. I then added a piece of black and white washi tape to the edge of my card to give a funky look.


I stamped and die cut some pine cones, foliage sprigs and a Poinsettia. I the assembled them into a cluster in the corner of my card using some foam tape for added dimension.  All that was left to do was add a sentiment, I chose a lovely one from the Lyrical script set and stamped it in black ink.

I still have a few more cards to share with you so will be back on Monday with another post.
Take care.

15 December 2017

Christmas Wishes using Paperbabe stamps cute nativity set

It's time for a new challenge over at Paperbabe Stamps blog and it's your favourite theme

"Anything Goes"

I took the opportunity to add another Christmas card to my stash and created this cute card as inspiration for you all


I Inked my sky using 3 shades of Distress Inks, I blended them together and flicked some water on top.   I stamped my Angel using the Cute Nativity Stamp Set and coloured it with Alcohol markers.


I added a sentiment using the Sparkle Bright Stamp Set and finished my card by placing the Angel onto some foam tape to add dimension.

If you'd like to join in with the challenge then pop over to the blog and add your project using the Linky tool and who knows you may be the lucky winner of a prize from Kim.

Thanks for stopping by today


14 December 2017

Tattered Lace Vintage Baroque - DT Samples

Today I am sharing some DT samples I have made for Tattered Lace dies.

Tomorrows Weekender deal on Create and Craft TV  is the Vintage Baroque collection.

I was sent 2 dies sets from the Vintage Baroque set to work with, the  tealight-box and the 

I apologise in advance as I've had an issue with my camera and my pictures are not very good


You can watch the launch at 12pm  on Create and Craft TV 
  • Sky 674
  •  
  • Freeview 23
  •  
  • Virgin 748
  •  
  • Freesat 813
  •  
  • Apple TV
  •  
  • Amazon Fire


13 December 2017

Contemporary Christmas cards using Altenew dies and stencils

It's hump day, yay.

I am so tired lately but have so much to do for Christmas; so I have been looking for quick Christmas card ideas.

I decided to go with a contemporary look and use a stencil and 2 die sets from Altenew.


This first card was made by using the Watercolor stripes stencil and some Distress Oxide inks the create the background. I flicked some water at the ink and then dabbed with a tissue to create some lighter areas.


I then die cut my sentiment using the Bold Alphabet dies and the Merry Christmas dies, I cut them from a true black cardstock so that they were nice and bold.


I couldn't bare to throw away the waste from cutting the sentiments so decided to put it to use and make a card with it.


Again I used the stencil for the background and flicked water at it. I also cut the Ampersands using the Merry Christmas word dies. 


I love this strong bold look, it's very fresh and modern and really suits a younger recipient.

The items I used are linked below


I have lots more Christmas cards to share with you over the next week and hope you'll come back soon.

Terri 

08 December 2017

Tattered Lace embossing folders - DT Samples


Hello Crafty friends, today I am sharing some cards I made using the upcoming release from Tattered Lace.

The release this time is Embossing folders, yes you heard me right yummy embossing folders.


I was sent two folders to work with and have made 4 cards and a box.


For this card I applied a little ink using a blending tool


For this card I left the embossing natural and added embellishments.


This time around I used a white core cardstock and after embossing I gently sanded the raised areas to reveal the white core


Next I decided to go vintage with my last card, I chose Kraft and beige as my colours with a touch of brown distressing.


I thought it would be lovely to make a matching box for such a pretty card 


The embossing folders are launching tomorrow morning at 8am  on Create and Craft TV

The link below will take you directly to the products


07 December 2017

STAMPlorations CAS Card Challenge - December


It's time for a new CAS card challenge at STAMPlorations

I have made a card to help inspire you


 I have used the Delight in the joys stamp from the Typografia Christmas range.

I stamped and heat embossed the sentiment in gold and then added some watercolour over the top. Once dry I tore around the sentiment and added it to a card blank using foam pads.  I then added a strip of gold glitter washi tape to the edge of the card.

To join in with the challenge visit the link below


I have a discount code for you to use on the STAMPlorations store which will entitle you to 20% off your order, this can not be used with other discount codes

Use>>>>>>  STAMPGIRLTERRI when checking out at http://stamplorations.com/shop/

01 December 2017

Paperbabe Challenge #62 - DT Inspiration


It's time for a new challenge at Paperbabe Stamps

this time round it's a picture inspiration


You can use the picture any way you like, pick the colours, texture or the tree to inspire you, it's your choice, just let your imagination and creativity run free.

I have put together a project to help spark your creativity and have been so eager to share it with you


I'm calling it "The first flurry"

I love winter time as it is such a magical time of year, I crave snow and frost as it looks so pretty, which is why I had to add snowflakes to my project.


I used a crackle medium on the large frame background to represent the bark int he picture. I chose to use my Gelli plate for colouring the MDF pieces as it adds texture and interest and to be honest I'm not that good at creating realistic portrait pieces.


I am so happy with how this project turned out, it's been sat on my mantel piece for 3 months waiting for the right time to share it.

Here's a list of items from the Paperbabe store that I used to create my project.


You can join in with the challenge by popping over to the paperbabe stamps blog and linking your project, Kim will pick a winner and they will receive a prize.