28 July 2017

Tattered Lace Launch - Design team samples

What a treat, this is my second posting today and I have lots to share with you.

Tattered Lace have a launch on Create and Craft TV this evening at 8pm and I have some samples to share with you.

All of my samples were made with Tattered Lace dies, I have listed the links to the dies under each photo.


I used the Enchanted-butterfly die to embellish a simple easel card, butterflies really are a crafters best friend.


I used the With-love-adornment to add a floral arrangement on the bottom of a gift tag


I thought a hexagon card would a nice shape to work with and would show off the Blossoming-branch beautifully. 


I added the Blossoming-branch  Paisley-corner  2017-bow-die to a twisted easel card


The 2017-bow-die is big and beautiful that I really wanted it to speak for itself so I kept this card simple and elegant. I love the pink, black and gold.


I made a Z fold card in beige and blue, I added the Enchanted-butterfly  and Paisley-corner to give a really soft and dreamy feel.


This card was all my daughters idea, the pale teal and white work so well together with the 2017-bow-dies as the main focus. I'm sure that she has more creative talent than me.


I used 4 of the Paisley-corner die cuts to frame a sentiment, I opted for white, pink and a touch of silver. It's a really pretty card perfect for a weeding.


I always try to make something different with the dies I'm sent and decided to use the With-love-adornment to create a floral arrangement, I cut 6 of them and placed them behind a circle and then added an MDF sentiment on top.


This is a simple card that allows the With-love-adornment to shine in all it's glory, I stuck to a simple pinky peach tone for the flowers and background.


The blossoming-branch was coloured in a pale blue and mounted onto a die cut plaque, I also coloured torn strips of paper to match and placed them under the plaque.


This is a fun card and very modern and clean. I used the Enchanted-butterfly to cut 3 butterflies from coloured card, I also used the die to cut 3 apertures from a panel of white card and then place the coloured butterflies in the void using foam pads.


 As you can see I made lots of card with the dies I was given, they are just so versatile and a must for any crafter.

You can watch the launch show on at 8pm on 
  • Sky 674
  •  
  • Freeview 23
  •  
  • Virgin 748
  •  
  • Freesat 813
  •  
  • Apple TV
  •  
  • Amazon Fire


Paperbabe Stamps challenge #53 - DT Inspiration.

Today we have a new challenge on the Paperbabe stamps blog and the theme is

"FLOWERS" 

I'm sharing my DT inspiration below


I created a cute little card with matching envelope and a gift tag. I used the Whimsical Woodland stamp sets with pastel inks to create a soft feminine look.

You can join in with the challenge by adding your project with the linky on the Paperbabe blog, you may even win a prize!

24 July 2017

Mixed Media Fantasy Feather.


Morning crafty friends today I have a post on the Colourcraft blog showing how I created this Fantasy Feather, to see all the details visit the link below


21 July 2017

Geometric fun with Triangle Turnabout from Concord and 9th


Happy Friday everyone

Today I am sharing more cards made with the Triangle Turnabout stamp from Concord and 9th, I shared a post on Monday with the first card I made using it, you can see that here;

https://terrikoszler.blogspot.com/2017/07/mens-cards-are-no-longer-problem-with.html


I thought I'd have a play and see what else I could make, I decided to make a card for the ladies first, I used Pink and grey inks from Altenew.


I team the Triangle turnabout with Altenew's Halftone happy stamp and die set again, this seems to be my go to set.  I die cut a heart aperture from the background panel which I can use on another card in the future.  I placed a piece of black card below the aperture to make it more dramatic.


This time I die cut the happy out of the printed background and placed the stamped panel on to some black card.  I love the black against the pattern, it's so funky and modern.


This really is such a super stamp set, its fun to use and the possibilities of colour combinations are endless.

That's all from me today, the children break up from school for the summer at 2pm so I best go shopping and fill the fridge and pantry as I am sure they will eat me out of house and home.

Terri x

17 July 2017

Men's cards are no longer a problem with this Geometric background.

Have you ever struggled to make a card for the men in your life? 

As someone who loves to make cards I have to admit that I have always struggled to make men's cards that I am happy with.

  There are lots of products out there for male cards but I'm a clean and simple girl at heart so, racing car decoupage and golf stamps really aren't for me.

As soon as I saw the Triangle turnabout stamp from Concord and 9th I knew I had to have it, I know I'm a little late to the party with this but my excitement is too much to contain.


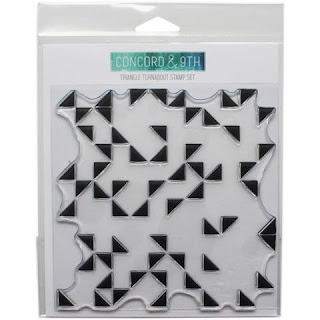
If you haven't seen the Triangle turnabout stamp before here's what it looks like


You're probable thinking how do you make that look like the picture above!  It's all in the name, Triangle turnabout!  You stamp once, ink your stamp with another, turn your card and stamp. You can do this up to 4 times, you are able to create different looks depending on ink colours and the number of turns.


I did 4 turns each with a different shade of ink.  I used the Altenew crisp inks Cool summer night mini cube collection.  The inks are perfect for a tonal look and I use them all the time in my crafting.


While the ink was still damp after my last turn I decided to try throwing some silver WOW embossing powder at it - not literally, I delicately poured it on and tried to save all of the excess as I am such a frugal crafter :)  I was amazed at how the powder stuck fully to the most recent inking and slightly to the earlier inks that I used, It gives a really cool distressed gilded effect.


The stamp will give you a 6"x 6" patterned panel once complete.  I cut this down and was able to make 2 cards with it.  I wanted to keep the design simple and clean so team the background up with Altenews Halftone happy stamp and die bundle.  

I think they are a perfect match for each other and can't wait to make more male cards and experiment with colour to achieve different effects.

Have a super week x

14 July 2017

Paperbabe Stamp Challenge #52 - DT Inspiration

Today on the Paperbabe Stamps Blog we are launching a new challenge
this time it's a layout inspiration


You can use the above picture any way you choose keep it simple or flip it, just let your creativity flow.  If you use Paperbabe products and link the project over on the Paperbabe blog you could be in with the chance of winning yourself a prize from the awesome Kim Costello.

I have put together the card below using the layout as a guide.


All the products I used apart fro the sequins are Paperbabe products. I kept the basic layout the same but change the orientation of the base card.


I applied some light pink ink through the rose stencil using a blending brush to give a soft covering.  I then used the herringbone stencil and added some light green ink. I added this to my card with a white stitched edge circle between. 

 I then cut a banner/pennant and stamped my sentiment using the birthday wishes stamp set, I chose to use grey ink so the look stayed soft and feminine.  I then coloured an MDF wooden rose embellishment and sprinkled a few iridescent sequins to add some texture to the card.


All of the products used can be found in the Paperbabe Store on Esty 
via this link >>>Paperbabe Stamps Shop

I can wait to see what you create.

13 July 2017

Tattered Lace Fantasy Christmas Launch - Design Team Samples

Hi guys
Just a quick post to let you know that Tattered Lace have a launch show tomorrow with their Fantasy Christmas Blockbuster.

There are so many amazing dies and the prices are sure to be fabulous as always.

I have added pictures of my samples below with links to the dies below, this will take you to the die on the Create and Craft website.


Square Holly Die -  This used 4 of the mini holly frames to make the wreath.

The launch show is at 12pm tomorrow (Friday 14th July) and you can watch on 
  • Sky 674
  •  
  • Freeview 23
  •  
  • Virgin 748
  •  
  • Freesat 813
  •  
  • Apple TV
  •  
  • Amazon Fire

09 July 2017

How to achieve three looks with one set of Altenew stamps


Today were talking about how to achieve three looks with one set of Altenew stamps.

I've had the Tulip set in my collection since it was released but only used it twice, I recently added the coordinating die set to my collections and yesterday decided it was time to get them out and make some cards.


For each of the 3 cards I made I stamped and die cut 3 Tulips


For this card I used the Altenew grid stencil to add a subtle yellow pattern to the background, I glue the stems flat but placed the flower heads on foam pads for added dimension. I stamped a sentiment onto some white card and mounted it on to black, I love the jaunty angle.


This is my favourite of the three I am sharing, the background was created using Altenew's watercolour strip stencil, I used the jet black ink and a foam blending tool to add the background, I then heat embossed it with clear embossing powder.  I added the Tulips the the left of the card and placed a sentiment to the right.  I played around with the look by having the leaf on the left over hanging but having the sentiment to the right cropped. I think it adds extra interest to the card.


This card was a simple one, I added the flowers and sentiment and then embellished with sequins and Nuvo drops.  I think this one is perfect for a friend who is maybe going through a bad time. It's simple and elegant.

I enjoy using different backgrounds to change the feel of my cards, from simple CAS cards to funky bold backgrounds, it's good to have a card for every occasion in your stash. You can also use different sized cards or change the orientation from a traditional right hand opening card to a tent fold.

Which card do you like the best and why?

Terri 

07 July 2017

Does every card need a sentiment?

Morning Guys

Today I am asking you for your opinions, I recently made a card and was caught up in the moment and didn't think about where I would put a sentiment.

So here is the card in question:


So my question to you is; does every card need a sentiment?  If so where would you place one on this card

Here's a closer look at the flowers I stamped and coloured with Altenew's Garden Treasure and Artist markers.


I still can't decide if it's fine as is or if I should take the plunge and add a sentiment, so please comment below and give me your thoughts.

Terri


05 July 2017

Masking technique Altenew Garden Treasure

Today I am a little nervous as I'm sharing a video I made, I really don't like hearing my own voice but as I've been asked several times how I create layers in my stamping I thought it was about time I grabbed the video camera and shot a quick video.


I hope you'll find the technique useful, If there is anything else you'd like me to video then please let me know in the comments below.

03 July 2017

A soft and subtle card using Golden Peach embossing powder from Altenew

Good Morning Crafters, It's Monday and I have a very quiet week ahead so I have the chance to get some crafting and blogging done in advance.

I have recently decided to start a planner, something I've never done before!  I am going tobe using Altenew products and sharing my journey with you here but also on a new Instagram account; https://www.instagram.com/altenew_planner_girl/  search @altenew_planner_girl and follw my progress.

Well enough about that let jump right into a new project.

Altenew layered medallion card by Terri Koszler www.terrikoszler.blogspot.com


I made this card yesterday using lot's of my Altenew stash.

Stencils

Stamps

Embossing powder

Inks


I started by using layered medallion a and applying rose quartz and sand dunes ink, I then added the b stencil and applied mountain mist ink.


I cut some peach vellum and heat embossed my sentiments from the 2 stamp sets linked above.  I love this embossing powder as it is so fine it melts quickly not buckling your card/paper.  It also has a stunning metallic sheen.


I decided to add some peach sequins and Nuvo drops to embellish.

I love how soft and subtle this card looks, it's so dreamy.....


Thanks for stopping by today.