28 October 2016

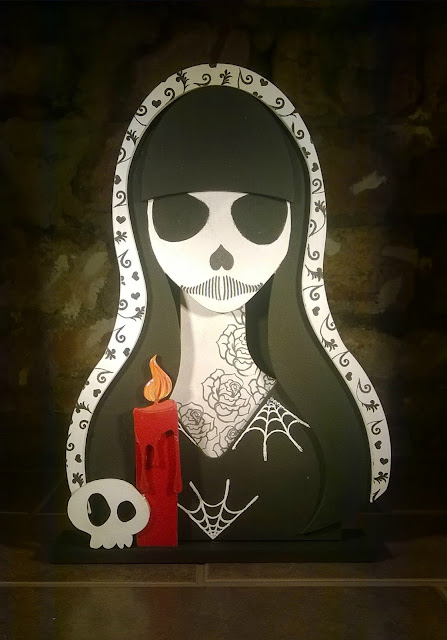
Paperbabe Stamps Challenge #45 - Spooooooooky

Good morning

Today we have a new challenge up on the Paperbabe Stamps Blog and this time around the theme is "Spooky"

As always there's the chance of winning a prize from Kim at Paperbabe Stamps
All the details you have are on the blog including the link to add your entry.


I created my design teams inspiration using the following products 


A couple more views to highlight the details


I am loving the MDF substrates and this one is sat in my  fire place with a couple of pumpkins looking very spooky.

I can't wait to see what you make.

26 October 2016

Srcap busting and finishing WIPs

Hi Guys, I'm still busy scrap busting and working my way through my WIPs, well my papercrafting WIPs, let's not mention the knitting, crochet and cross stitch ones that have gone up in the loft for the time being.

Today I have a couple of cards I made using some scraps


This card used some ribbon and a piece of card that was leftover from another project. I coloured it using Momento ink and a little water to create a water colour effect.


This card came about as I had tried out a stamp that came free with a magazine and then put it to one side and forgot about it. I found it this week while tidying up my desk and thought I should use it to create a a small 5x5 card. The bakers twine was an off cut and the sentiment was also from when I tested out a new stamp set.

I am determined to work my way through all those bits and bobs and make pretty things with them.

I'll be back on Friday with a new Challenge from Paperbabe Stamps.

T x

25 October 2016

Beautiful Daisies - Altenew

A real quick post today as I'm on a role with cleaning but couldn't resist sharing this card.


I spent yeterday clearing up my craft space and sorting out my WIPs (work in progress) and scrap box and the result is this cute card.

I has stamped the Daisies a while ago but hadn't got round to using them and I had a few scraps of Vellum, kraft card and twine.

I cut the "Happy" from Kraft card and stamped it with Altenews halftone happy set. The daisies are also from Altenew. I used various adhesives from Stix2 to bring it all together.

I hope you're enjoying half term if you are in the UK. If you stop by tomorrow I will have another scrap busting card to share.

T x

22 October 2016

Imagine and you can achieve


Today I am sharing a card I created using some of my favourite craft items.

As you know I love to stamp, over the last year my ink pad collection has grown from around 10 to around 150. Each time I get new inks I like to create a colour swatch like the ones below


***My top tip***  
Take a photo of your ink swatches and keep them on your phone and then when your at the craft store you know which colours you own and which to buy!


I then like to try out techniques and see what can be one with the inks other than just stamping. One of the things I like to do is use water based in to create background effects and to watercolour my stamped images.  So this card really came about by putting together some ink techniques along with a stamp I love and of course a few staples from my stash.


I started by stamping a flower 3 times using Versamark ink, I then heat embossed it with a fine gold embossing powder. I set these aside to cool while I used an Altenew die to cut some leaves from a sheet of Vertigo. Which I then stamped the coordinating detail onto using Stazon ink.


I grabbed some Memento ink, water and a paint brush and added a colour wash to the flowers, I gave them a little blast with my heat gun being careful not to melt the embossing powder and then fussy cut them.


I added a strip of green glitter tape to the right side of a 5x7" card blank and then added the flowers and leaves. I stamped a sentiment from Altenew using Stazon ink and then added some inky splatters from using the memento ink that I used for the flower.


The card will be added to my collection and at some point given to a friend or loved one.

Thank you for stopping by

Hugs Tx

20 October 2016

Paperbabe Stamps New Release - "Bottle of" stamp set and substrates Day 2

Today I am sharing the second of my Design Team projects using the Paperbabe stamps October release.

Today's project is an 8x8 card with a Love potion as the main feature.


I stamped bottles randomly over a piece of white card and then added the bottle tops, I wanted to keep one bottle as the main focal point so used the crackle/distress stamp to fill the bottle. As I had already stamped the outline I needed to be careful not to miss stamp, so I used the bottle template to cover the rest of my background and stamped into the void.


I added labels to all of the bottles but wanted my "LOVE POTION" to stand out so I stamped the tag on to white card and cut it out, I then stamped the word "Love" in red ink and punched a hole in the tag.


To attach the tag I punched a small hole either side of the bottle neck and threaded some twine through, this allowed me to attach the tag and give dimension to me card. I added some gold ink to the lid of the bottle and stamped little red hearts in the background.


The new release really is versatile, be it mixed media potions and spells or cute bottles of perfume on cards you can create so many wonderful images. The new release will be available tomorrow in the Paperbabe Etsy store...https://www.etsy.com/uk/shop/PaperbabeStamps

If you have a moment here's more awesome inspiraton from the rest of the design team


19 October 2016

Paperbabe Stamps New Release - "Bottle of" stamp set and substrates Day 1

Today I am sharing one of my design team makes using the October release from Paperbabe Stamps.  Kim has designed stamps, MDF substrates and stencils which of course work perfectly together.

My altered art/mixed media project is a potion box using a old wooden jewellery box that I had lurking in the cupboard.


I covered the outside of the box in some veneer and rubbed it over with some wood stain to add an aged look.  used the stencil on the lid to keep the old look.


 I painted 3 of the MDF bottles with acrylic paint and then used the crackle/distress stencil to add some gold.  I glued the cork toppers on two of the bottles and stamped a tag onto Kraft card and fussy cut them. I added ingredients to the tags using the stamps.


 On the inside of the box lid I stamped a spell using the sentiments in the stamp set.


For the 3rd bottle I painted the smokey vapour in purple paint and glued it and a cork into the top of the bottle.


I had so much fun working with the new release and can see so many possibilities, join me tomorrow for another project, I will be creating a card using the new stamps.

You can find  more in inspiration from the rest of the design team here
Kerrie
Chris
Kim

The new release will be available in the shop Click here on Friday

17 October 2016

What an amazing few days I've had

As you know last week I spent 3 days at the Craft4crafters show running workshops, 12 workshops over 3 days with a total of 120 attendees. I had an absolute blast, yes it was exhausting, yes it was hot and loud but it was worth every moment to see peoples faces when they had finished their creation and looked at it with pride, those are the moments that make all the cutting and prepping worth while.

Here are a few picture of my display items and stand


A few of people busy creating


Over the next few weeks I will be sharing how I created some of the display items from my stand and hope that you will also give them a try.

14 October 2016

Paperbabe Stamps Challenge #44 - Design Team Inspiration

Good Morning Crafty Friends

We have a new challenge over on the Paperbabe Stamp blog today and this time it's a picture inspiration.


As always there is a chance for a prize from the lovely Kim Costello at Paperbabe, if you pop over to the blog using this link you can find all details and terms, now time for my Design Team sample.


I created my card using the designa-tweed-stamp-set to create a background with beige and black ink, which I chose to highlight the colours of the models coat and skirt. I then used mayleedee-little-red and stamped on to a piece of white card using Black Memento ink, at this stage I also added the sentiment.


I coloured a few areas of the stamped image using Promarkers to continue the colour theme, this was then mounted using foam tape for added dimension. Lastly I added 3 pewter coloured pearl gems in the bottom left corner.


I'll be back soon with more Inspiration Tx

13 October 2016

Craft4Crafters- Advent tree instructions

First of all I'd like to say a big thank you to all of you that came along to my workshops, as promised here is a picture of the tree that will hopefully help you understand the configuration a little more.


If you want to use the star provided you will need to fold all of them in half length ways, I then glued all three together to create a 3D star.

If you have any questions you should all have my email address feel free to drop me an email and I will help you out.

Terri x

08 October 2016

Autumn Squash home decor tutorial

In today's tutorial I am sharing some Autumnal home decor items with you that I have sewn, yes you heard me right I sew a little too (don't get me wrong I wont be appearing on The Great British sewing Bee anytime soon, my sewing machine hates me and the feelings mutual)


Materials;
Cotton fabric in your chosen design
Small elastic band
Loose fill toy stuffing
Embroidery thread to co ordinate with fabric
Thin rope/thick twine
Cotton thread


Cut your fabric to measure 36cm x 24cm, fold in half and pin the outer edge,  Sew a line of stitches along the pinned outer edge of the fabric (creating a tube)


Hand sew a line of running stitch along the bottom edge of the fabric using a double thickness of cotton thread, this doesn’t have to be ultra tidy as we are going to gather the fabric.


With your needle still attached pull on the thread to gather the fabric as tightly as possible and secure with a couple of stitches.  Knot the thread and cut of the excess. Turn the fabric out so the pattern is facing outwards.


Fill the tube with loose fill toy stuffing until ¾ full, compact it down as you go so that you have a tight fill.


Add an elastic band just above the stuffing to close the fabric. Make sure this is secure and as central as possible.


Using a large needle and embroidery thread (6 strands) anchor the thread in the underside of the squash, you can hide the knotted end of the thread in one of the creases.


Bring the needle through the stalk of the squash just below the elastic band


Pull the thread through, the more you pull the bigger the indent will be. Take the thread back to the bottom of the squash and make a stitch and pull, you will now have 2 indents in the squash.


Repeat at least two more times.  You can add more indents depending on the look you want to achieve. You should now be able to tell that it looks like a squash. Secure the thread at the base of the stalk with a couple of stitches.


Creating the stalk

To create the stalk for your squash we need to bind the excess fabric by wrapping it with thin rope/thick twine.


Start by creating a large u shape, the end of the rope is on the left and the ball or rope is on the right. You need around 2 inches of rope above the fabric on the right hand side.


Using the ball of rope we now need to start wrapping the u shape we formed in the previous step, this needs to be a tight wrap.


When you get the base of the stalk you should still have a small loop showing at the bottom.  Cut the rope leaving a 3 inch tail.


Tuck the tail end into the loop as shown and then pull on the rope that is at the top of the stalk as this will pull the loop and tail into the steam and secure it.


If you have a small tail of rope left you can either cut it shorter or separate the treads a little to give the effect of the vine which a squash is cut from.


I then cut the excess roe from the top of the stalk to give a neater look.

You can experiment with a different size piece of fabric to give you a different shape and finished size.


Thank you for taking the time out to stop by, I hope you will give my Autumn Squash tutorial a go.